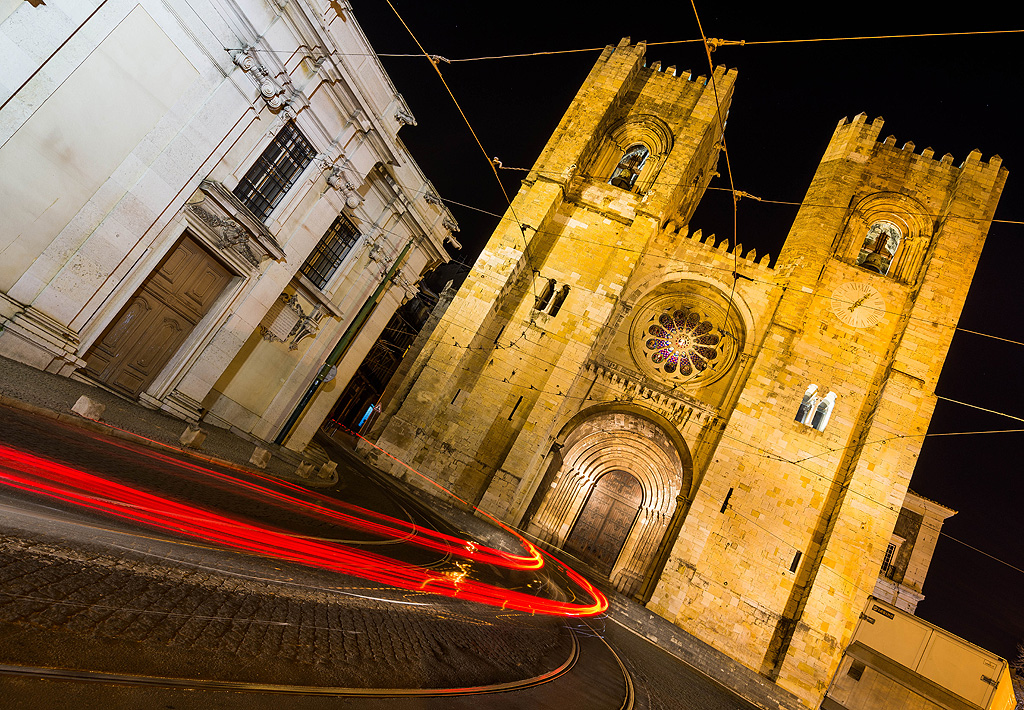
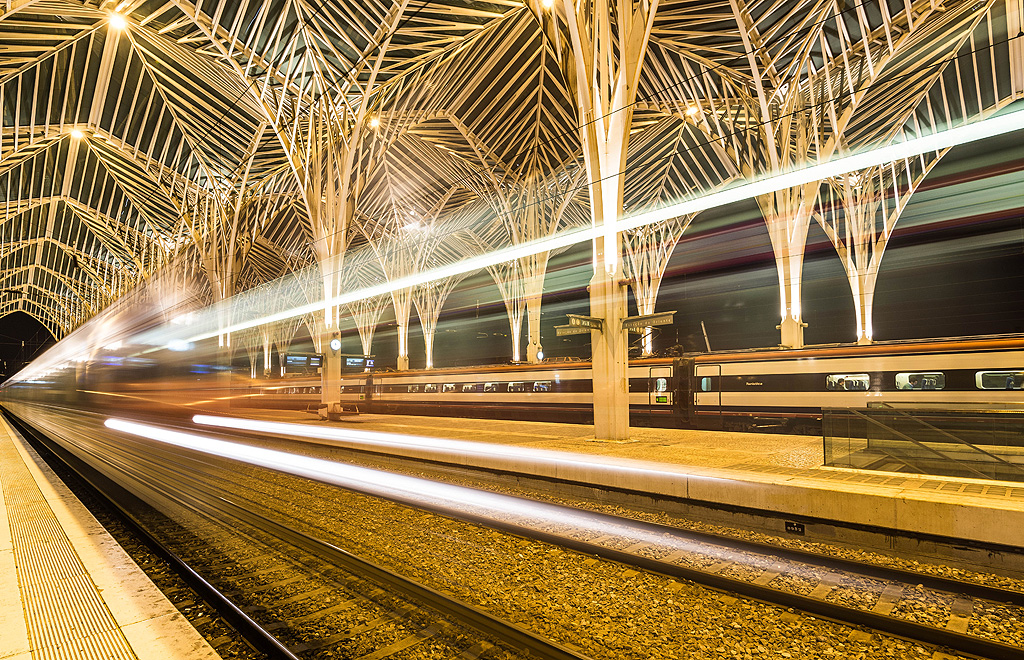
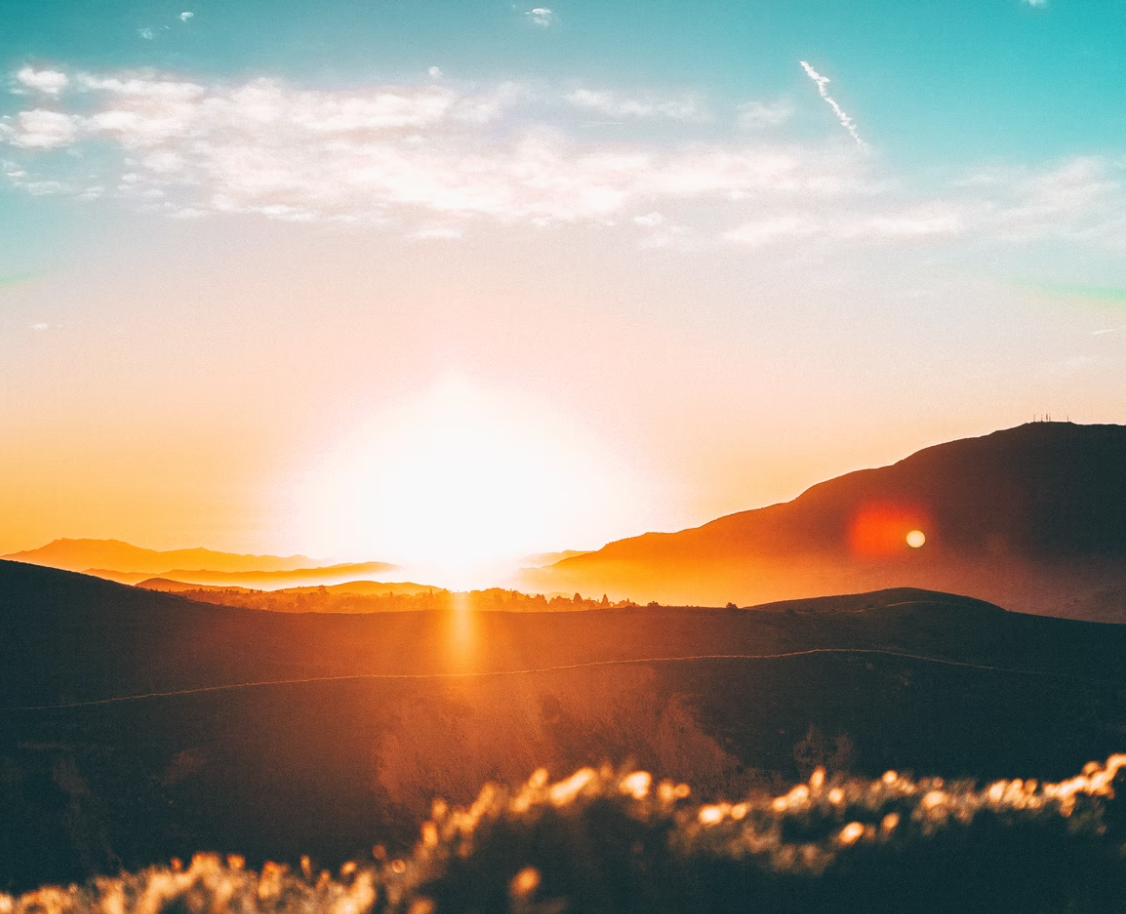
Better quality: https://www.flickr.com/photos/aaron_kreis/13591624245/
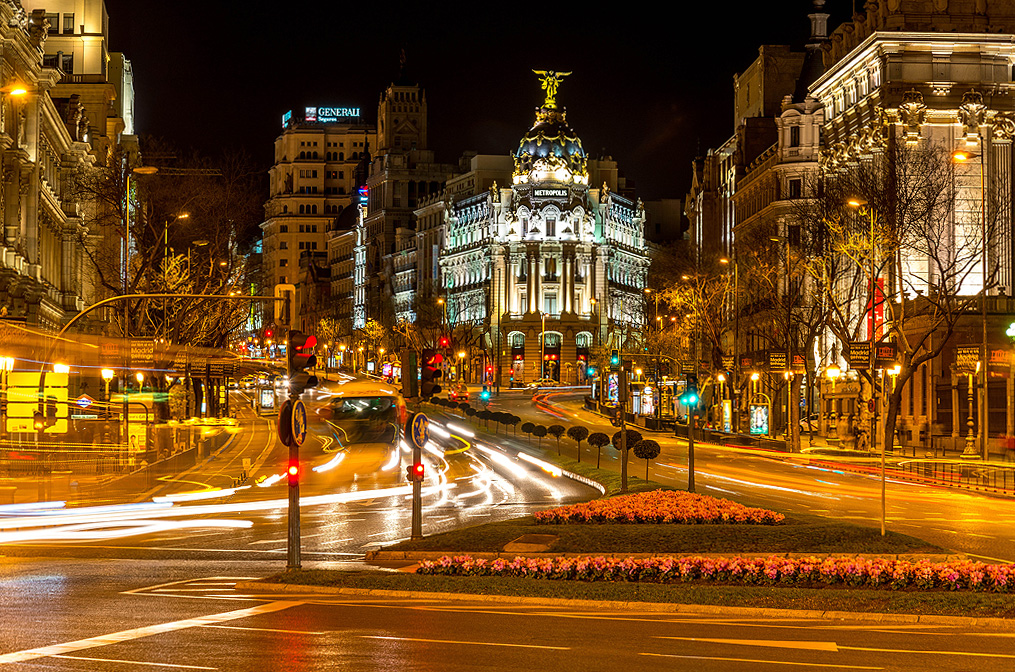
Better quality: https://www.flickr.com/photos/aaron_kreis/35959541982/
To create razor-sharp long-exposure shots, you must know some basic concepts in photography and set or configure your camera accordingly. I’ll first explain the terms very superficially and later discuss the interaction of these terms, e.g., what influence the ISO value has on the exposure time, etc.
Anyone who wants to create images like those shown above should know the following basic concepts and their dependencies on each other.
Basic concepts in photography:
- Focal length
- Aperture
- Fast lens
- Depth of field
- Shutter speed
- ISO
- Hyperfocal distance
- Camera filters
Focal length
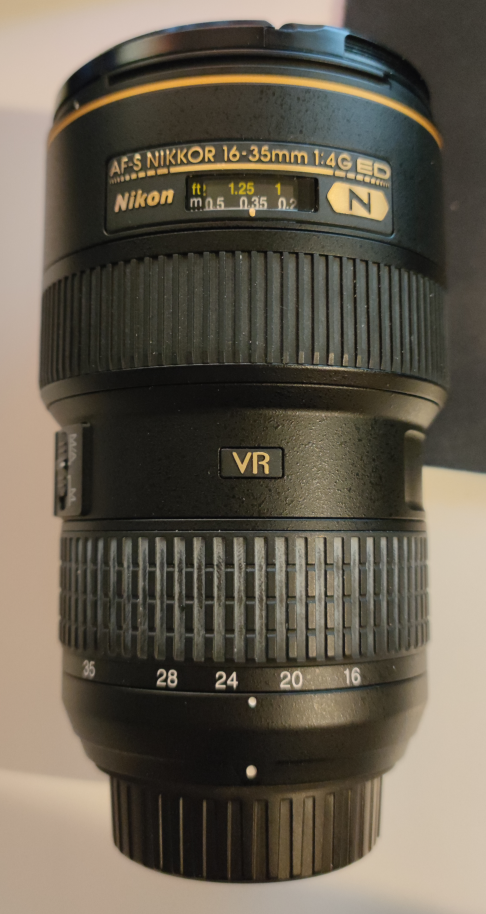
Wide-angle lens with a focal length of 16mm to 35mm
The focal length for this lens is specified as 35, 28, 24, 20, and 16 mm. By rotating the lens, the focal length can be set.
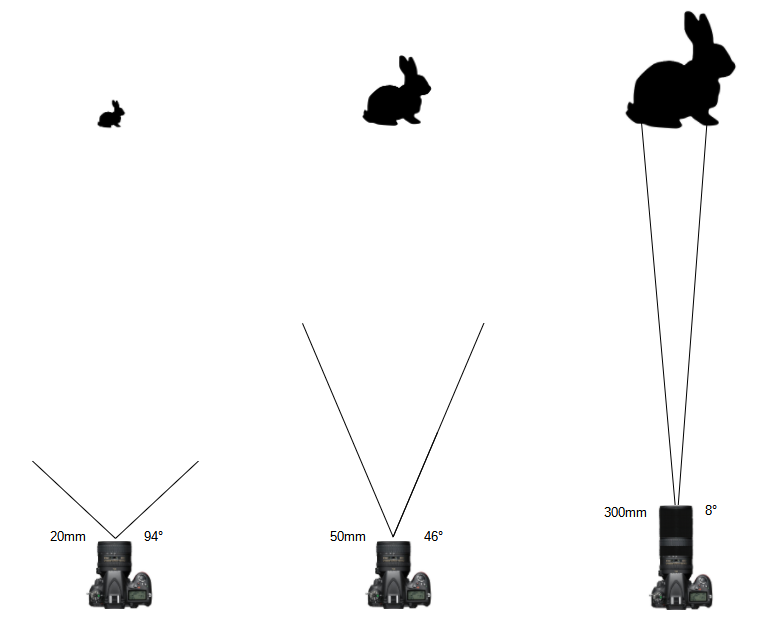
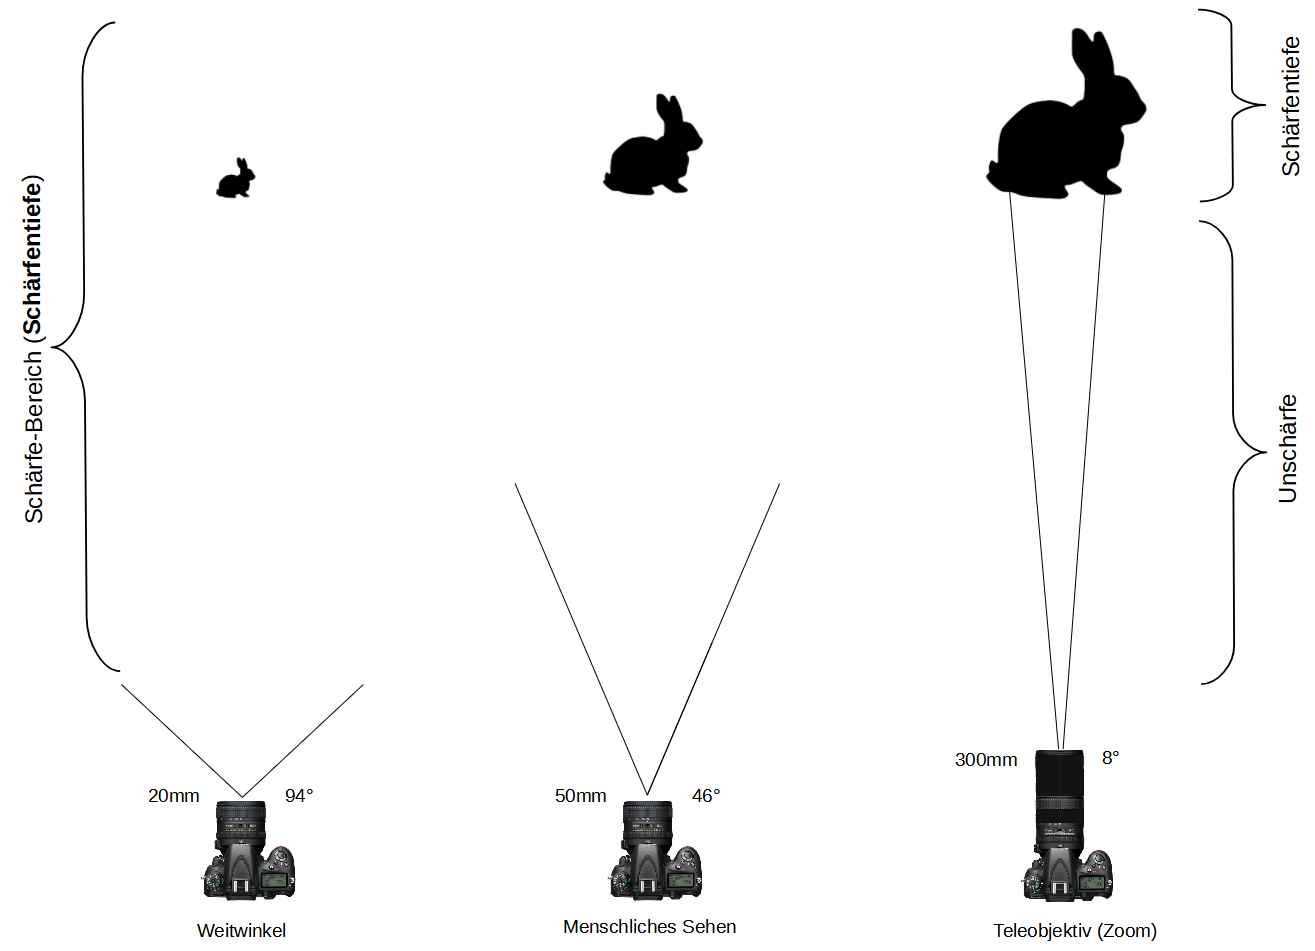
By adjusting the focal length, you can set the field of view on the camera. With a setting of 20 mm focal length, the field of view is 94°. At 94°, you can see a lot of the surroundings. At a focal length of 300 mm, the field of view is reduced to 8°, meaning you see much less of the surroundings. However, the reduction of the field of view (e.g., 300 mm and 8°) has the advantage that distant objects appear larger. Such lenses are used to photograph, for example, animals in the distance. At 20 mm and 94°, distant objects appear small. In return, because of the increased field of view, you can see many objects on the horizon.
Lenses that allow you to see objects (rabbits) in the distance magnified are called telephoto or zoom lenses. Lenses that show more of the surroundings and cannot zoom in on distant objects are called wide-angle lenses.
A 50 mm focal length with 46° corresponds to the human field of view. The lens supplied with the camera (kit lens) usually supports a focal length of 50 mm.
In summary:
Large focal length
- Small field of view. The photographer sees less of the surroundings
- The photographer sees the object larger than with a small focal length
Small focal length
- Large field of view. The photographer sees much of the surroundings
- The photographer sees the object smaller than with a large focal length
Aperture
In addition to the focal length, you can set the aperture. The aperture controls the amount of light that reaches the camera’s image sensor. It also influences the depth of field.
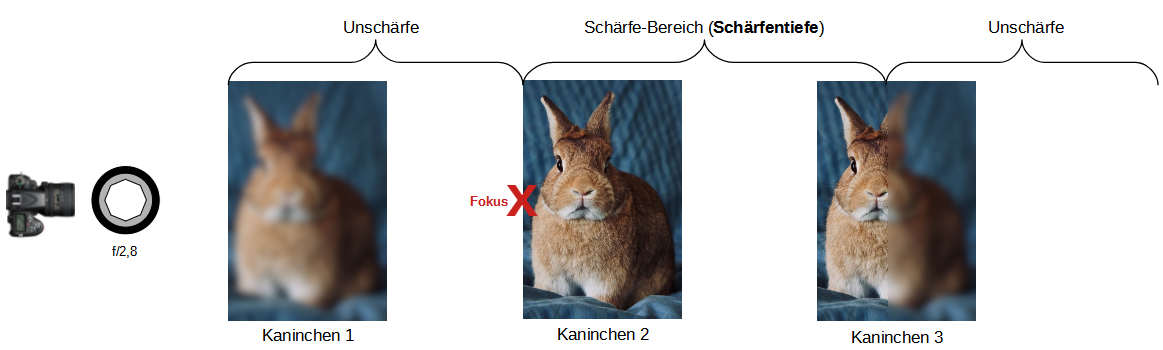
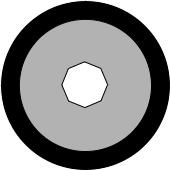
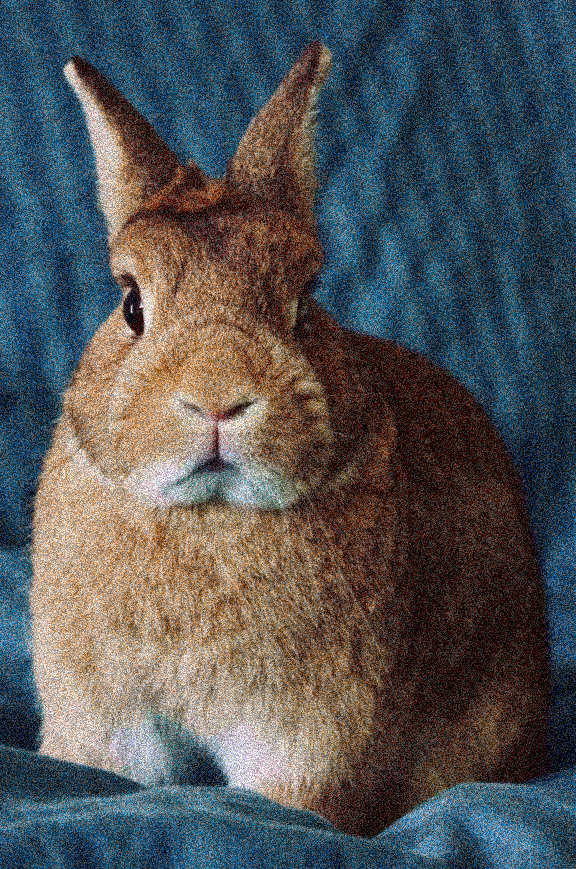
If I focus with the camera on the second rabbit on the left, one part of the image will be out of focus and another part will be shown in focus.
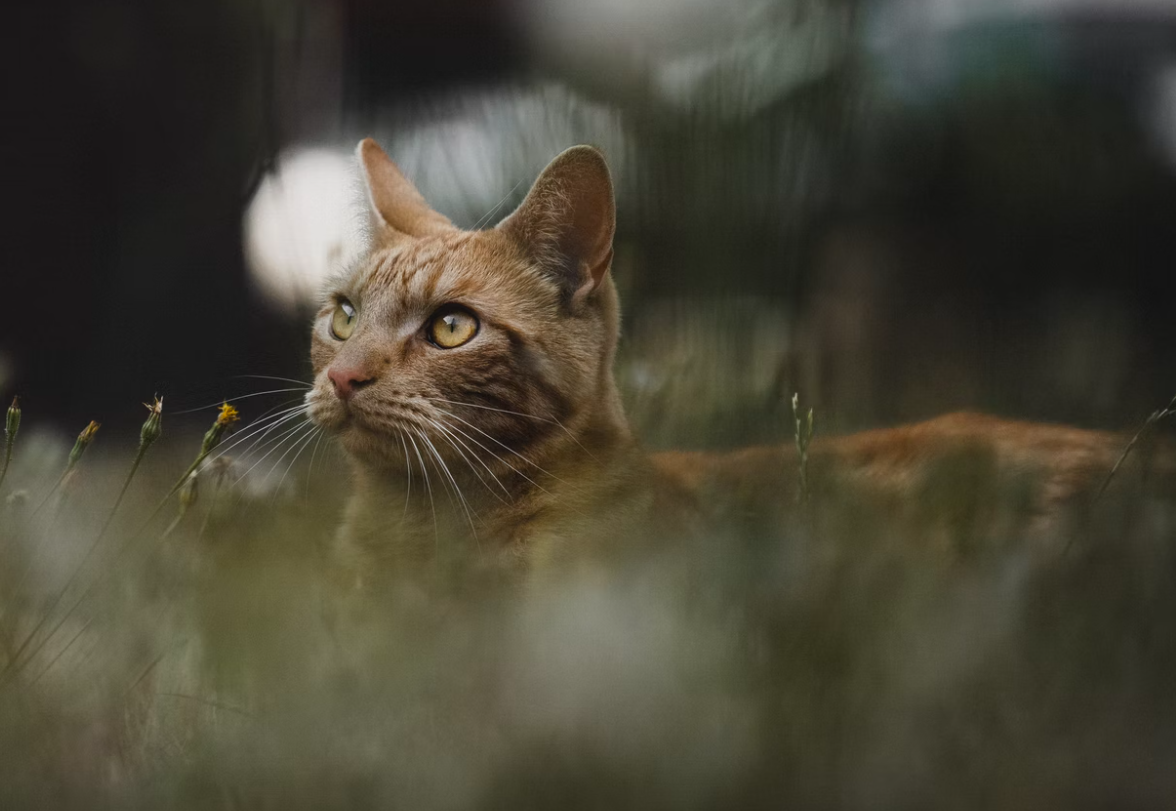
In this example, only the cat is shown in focus. The subjects in front of and behind the cat are out of focus. The sharply rendered area or depth is called depth of field.
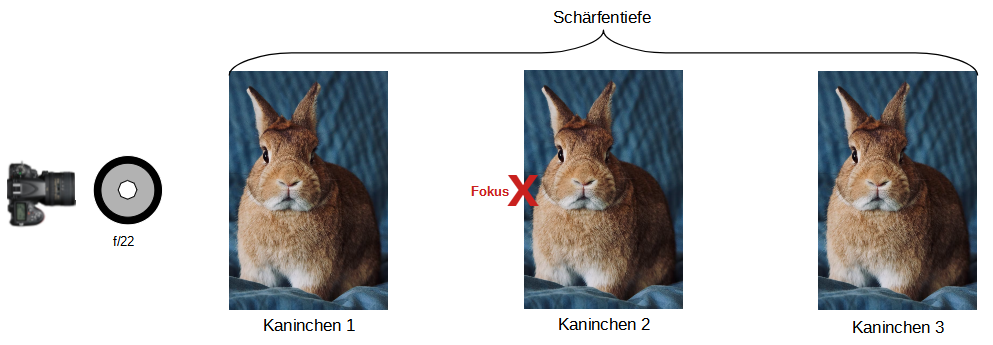
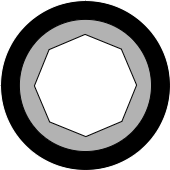
You can also set the aperture so that the entire area is shown in focus.
The control of the amount of light that reaches the camera’s image sensor and the depth of field is accomplished by opening and closing the aperture.
“f” is used as an abbreviation for aperture. The aperture designation is somewhat misleading. A closed aperture has a larger value (e.g., f/22) than an open aperture (e.g., f/2.8).
Example of a closed aperture, e.g., aperture f/22:
- When the aperture is closed, the depth of field increases, i.e., a larger area is shown in focus
- When the aperture is closed, less light can reach the camera’s image sensor
- Since there is little light, the image becomes somewhat darker than with the open aperture
- Since there is little light, the image sensor must be exposed for longer, i.e., the risk of blur due to camera shake is greater
- When the aperture is closed, it is called “stopping down”
Example of an open aperture, e.g., aperture f/2.8:
- When the aperture is opened, the depth of field decreases, i.e., only a small area of the image is shown in focus
- When the aperture is opened, more light can reach the camera’s image sensor
- Since there is more light, the image becomes somewhat brighter than with the closed aperture
- Since there is more light, the image sensor needs a shorter exposure, i.e., the risk of blur due to camera shake is lower
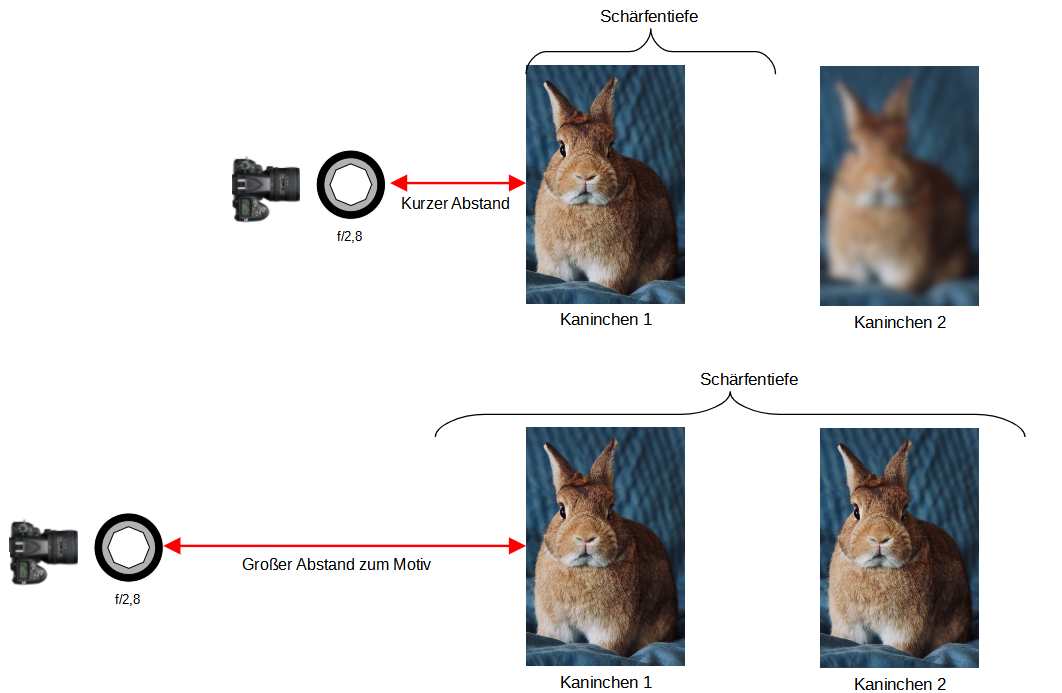
The distance between the lens and the subject also affects the depth of field. In this example, aperture f/2.8 was used both times. However, at a short distance between the camera and the subject (rabbit), less depth of field is created:
My kit lens offers the following aperture values:
- f/3.5
- f/4
- f/4.5
- f/5
- f/5.6
- f/6.3
- f/7.1
- f/8
- f/9
- f/10
- f/11
- f/13
- f/14
- f/16
- f/18
- f/20
- f/22
In the mid-range of aperture values, image sharpness is highest, i.e., if you photograph with this lens at f/8 or f/9, the image will be sharper than at f/4.5 or f/18. Don’t forget: depth of field at f/18 is greater than at f/4.5. Additionally, you should avoid photographing at the aperture extremes, i.e., according to the above, you should avoid f/3.5; f/4; f/20; and f/22 if possible, because image softness increases at the extremes. Anyone interested in the topic should look up the term “diffraction” in connection with the aperture.
Here again is the influence of focal length on depth of field:
Fast lenses
On a lens, you can see a number labeled 1:3.5-4.5 or 1:2.8 or 1:4, etc. We know these numbers from the aperture. In this case, this number tells us that this Nikon kit lens allows a minimum aperture of f/3.5 at a focal length of 24 mm. It cannot be opened further. When the focal length is set to 85 mm, this lens cannot support an f/3.5 aperture anymore. At a focal length of 85 mm, a minimum aperture of f/4.5 can be set. Or in other words, when you zoom into the subject (focal length 85 mm), the aperture closes down and the image sensor receives less light, which is why the image becomes darker and I have to expose for longer.
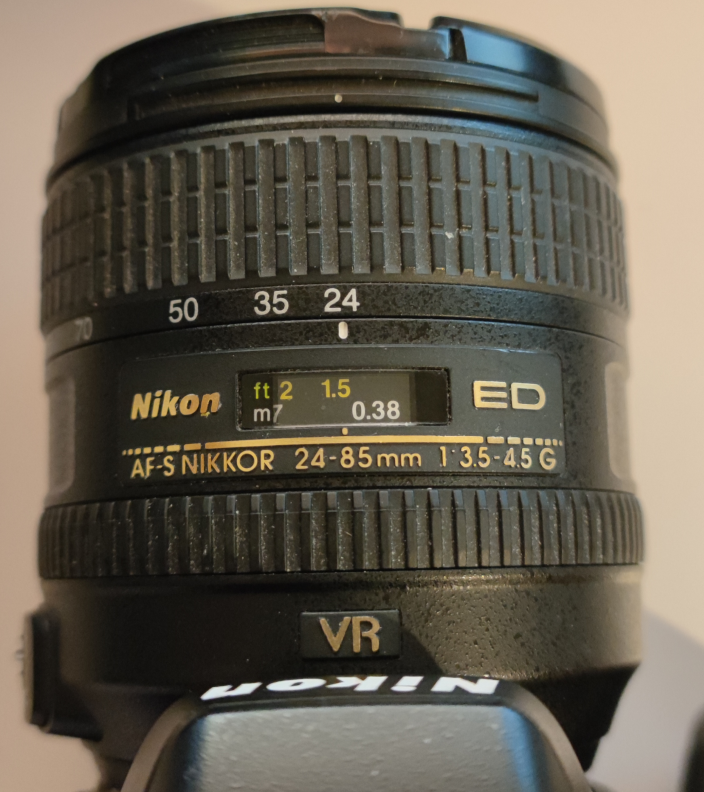
My kit lens with a focal length of 24-85mm
However, there are lenses that support the same aperture, i.e., the same f-number (for example, 2.8), over the entire focal length range from 24mm to 85mm. Therefore, they provide the image sensor with the same speed across the entire focal length range (24mm - 85mm). However, they are usually expensive, i.e., a lens can cost several thousand euros. These are referred to as fast lenses.
The following lens supports focal lengths of 24-70mm and continuously has a maximum aperture of f/2.8 (i.e., supports f/2.8 throughout) and costs about 1900€. When zooming, this lens does not lose speed.

Source: Amazon
For my landscape shots, such as those shown at the very top of this post, I use the mid-range focal length f/8, i.e., I don’t zoom in too much on the subject because I want to capture a lot of the surroundings (landscape photography). Since I don’t photograph at the focal length extremes (issue of distortion due to diffraction), I only zoom in a little.
I would like to photograph at a focal length of, for example, 30 mm with an aperture of f/3.5 or even better f/2.8, but unfortunately my lens does not allow that. I don’t worry much about depth of field because I am far from my subject and thus gain a lot of depth of field. The topic of “hyperfocal distance” also plays a role here, which I will address later.
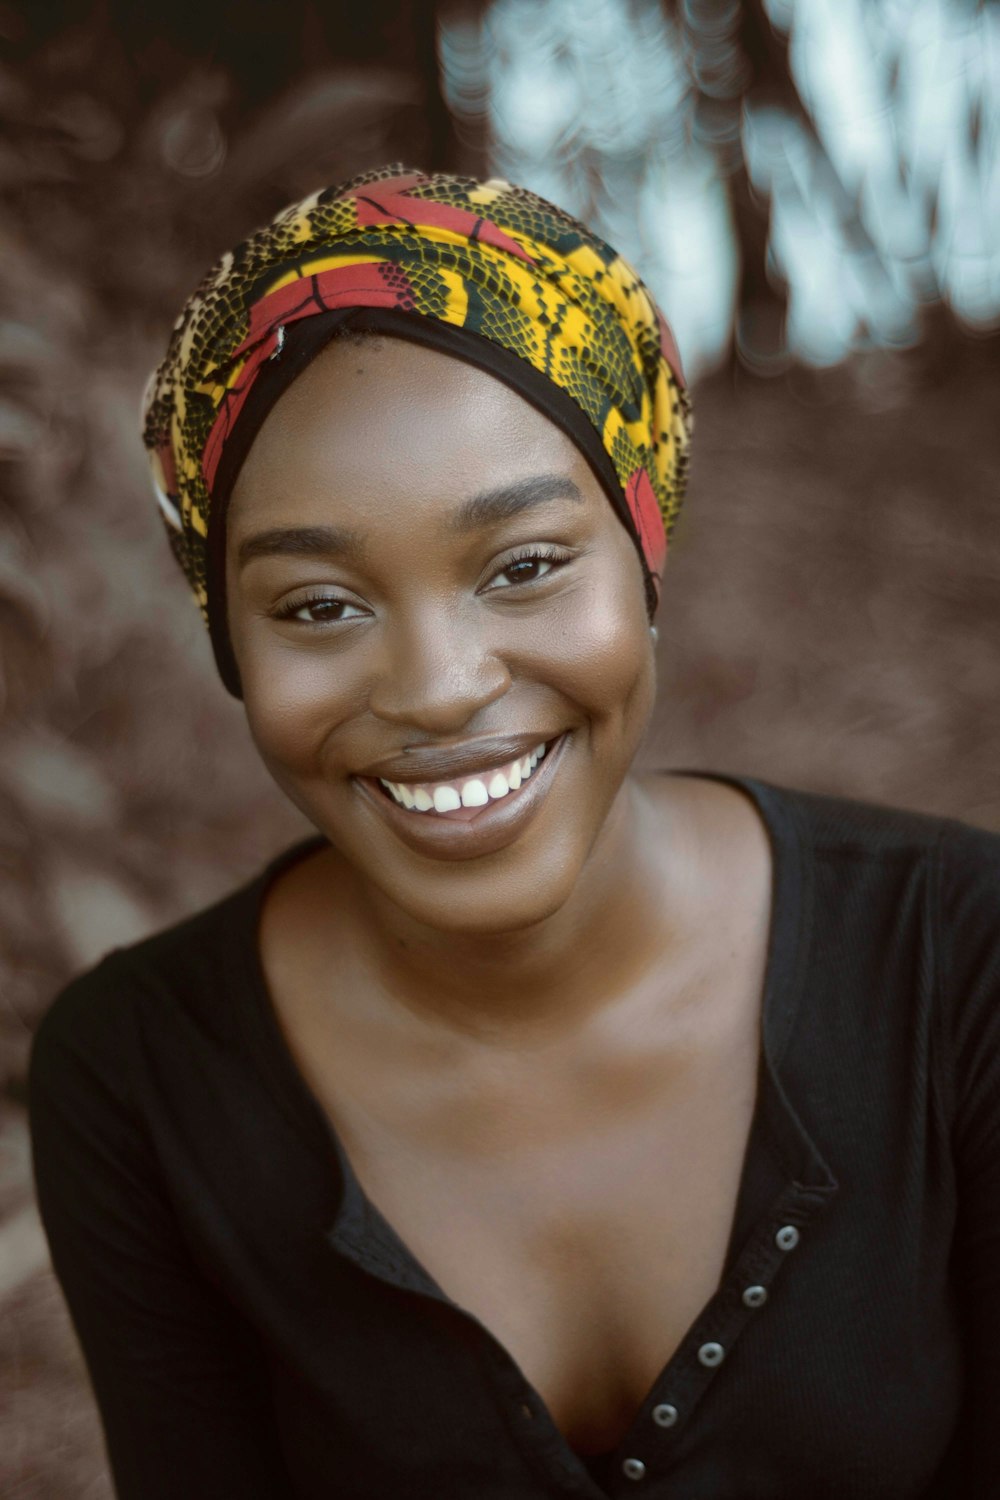
But there are also lenses with a fixed focal length, e.g., 50 mm (without zoom) with a fixed maximum aperture of f/1.4. Such a large aperture (small f-number) has little depth of field, i.e., only a very small area is shown in focus and the rest is blurred, and therefore it is often used for portrait photography. In the example below, only the woman’s face is shown in focus. Even her shoulders are shown out of focus. Here a large aperture, e.g., f/1.4 or f/2.8, was used. The photographer probably also came very close to the subject to further reduce depth of field. Image editing software may also have been used.
Shutter speed
As mentioned before, you can control the amount of light by adjusting the aperture. Small opening means less light and large opening means more light.
You can open and close the aperture by pressing the shutter release button. When the shutter release is pressed, the aperture opens as previously set, e.g., f/8, light enters the image sensor, and after a certain time the aperture closes again to stop the exposure. The time during which the image sensor is exposed is called shutter speed. You can expose the camera’s image sensor in fractions of a second, e.g., one four-thousandth of a second (1/4000), or for several seconds to minutes, e.g., ten seconds (10").
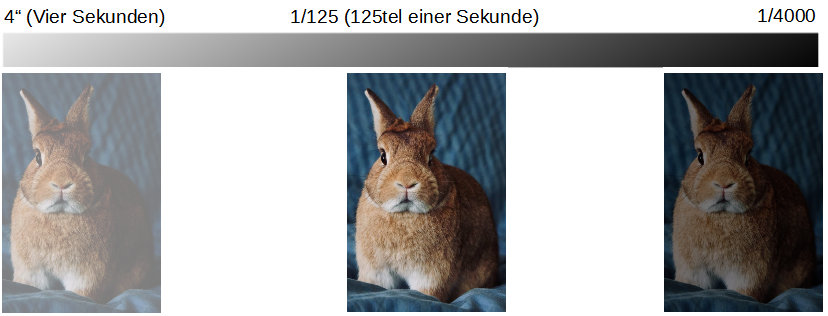
The longer the light hits the image sensor, e.g., 4 seconds, the brighter the image becomes. The shorter the image sensor is exposed, i.e., the faster the aperture is closed, e.g., after one four-thousandth of a second, the darker the image becomes. After all, the light only hit the image sensor for one four-thousandth of a second.
When the aperture is closed, the image sensor receives little light. In this case, the shutter speed must be increased. That is, the smaller the aperture and thus the larger the f-number, the longer the shutter speed must be set.
In this image, the image sensor was exposed for several seconds, e.g., 10 seconds.
The slightest movement during the 10 seconds causes the image to become blurry at the end of the exposure. Since I cannot hold the camera absolutely still by hand for 10 seconds, I have to use a tripod for all long-exposure shots.
Since I shoot in the mid-range aperture (usually aperture f/8), the aperture opening is the same size for me under all lighting conditions. As a result, I have to expose my images relatively long depending on the lighting conditions. Since I expose my images for a long time and the camera must remain absolutely still during that time, my tripod is very stable or high-quality. I also weigh down my tripod using the tripod hook. In wind, I stand in front of the tripod and give it wind protection.
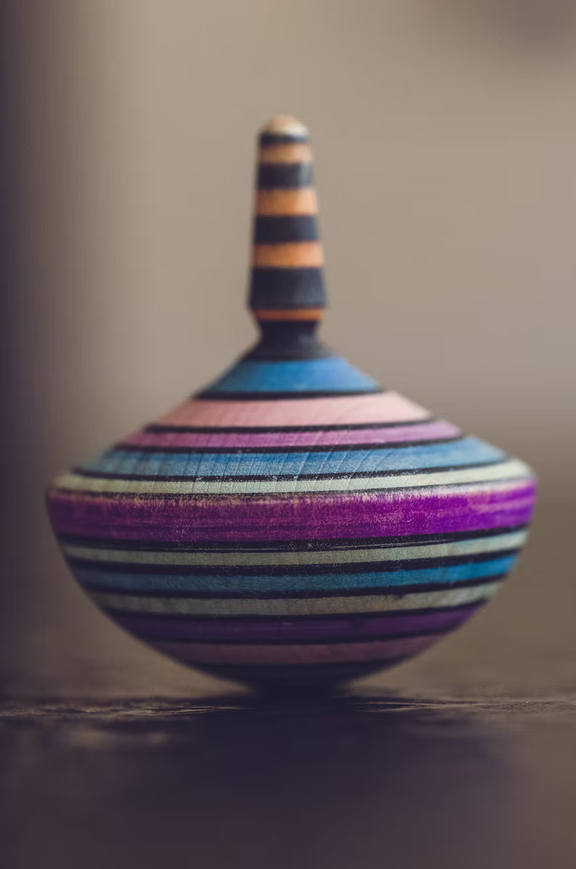
Long exposure works well for still life. With moving objects, like a spinning top, blurriness occurs.
Short Exposure
In this image, the image sensor was opened and closed for only a fraction of a second.
Long Exposure
In this image, the image sensor was opened and closed for 1 second, i.e., the motion was recorded for one second.

- The longer the shutter speed, the greater the risk of camera shake
- The shorter the shutter speed, the lower the risk of camera shake
- The smaller the aperture, the less light reaches the image sensor and the longer the shutter speed, thus increasing the risk of camera shake
However, you can also use blurriness to your advantage:

ISO
In the past, such films were used for photography:
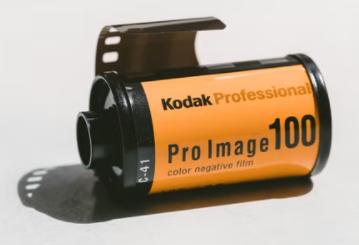
These films had a number on them, e.g., 100 or 400 or 1000, etc. This number indicated the film’s sensitivity to light. The smaller the number, the more light was required to expose the film. With the number 1000, the film responded more strongly to light, which is why you could photograph better in low light with a 1000 film than with an ISO 100 film. The disadvantage of a 1000 film was that, due to the amplification of the light, the quality of the image was worse. A grain (image noise) was visible on the image:
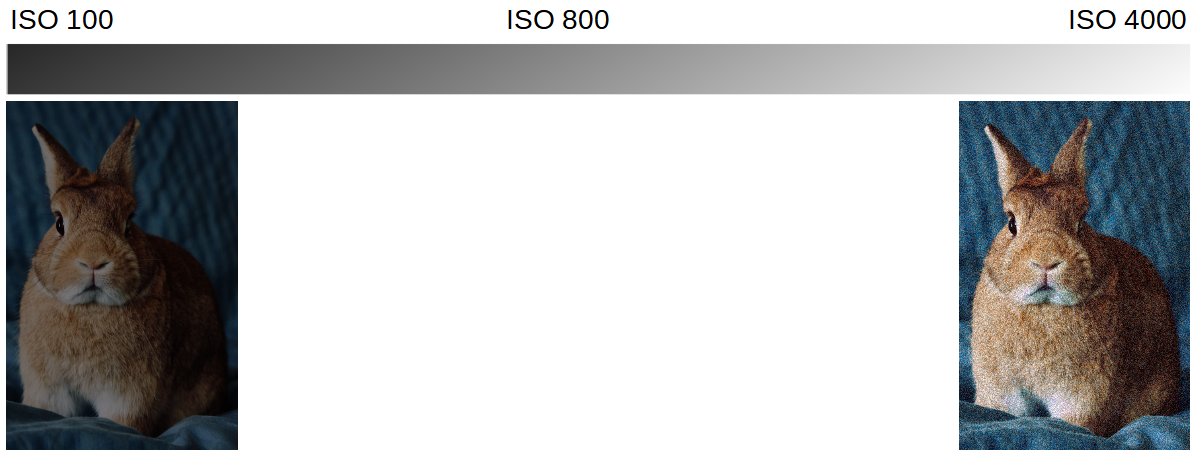
- The lower the ISO number, the darker the image and the longer the shutter speed
- The higher the ISO number, the brighter the image and the shorter the shutter speed
- The higher the ISO number, the more grain in the image (image noise)
- The longer the shutter speed, the greater the risk of camera shake
- The shorter the shutter speed, the lower the risk of camera shake
- Thus, the ISO number influences the shutter speed
In dark images, the image information is still present. Therefore, you can brighten such images afterwards with an image editing program. If the image is too bright, i.e., overexposed, the image information is missing. Missing image information cannot be reconstructed. Such images can hardly or cannot be rescued anymore. Therefore, if you have taken two non-ideal photos, you should choose the darker rather than the brighter one.
I (manually) usually photograph with ISO 100. On my camera, I either set ISO 100 or I use ISO Auto in the range of 100 to 1600. I don’t go above ISO 1600 because I can see the image noise on my camera. At ISO 100, I usually have to expose my images for longer, which is why I also use a tripod a lot. At sunset, the light decreases and the shutter speed becomes longer from minute to minute.
Therefore, I set up my camera beforehand, set the focal length, set the ISO value to 100 and the aperture to f/8, set my focus (to the hyperfocal distance, see below), and later only adjust the shutter speed, i.e., I “only” change the shutter speed and don’t have to worry about the other parameters.
Hyperfocal Distance
Hyperfocal distance plays a major role in landscape photography. In landscape photography, we essentially want infinite sharpness, i.e., we want an infinitely large depth of field. In this case, you don’t simply set the focus somewhere on the farthest area that you can see through the viewfinder. Instead, you must focus at a specific distance (hyperfocal distance), e.g., 12 meters, in order to capture all objects behind the focused 12 meters and even parts in front of the focused object in razor-sharp focus.
I previously used this image to explain aperture. Here, rabbit 2 was focused. Beyond a certain point, i.e., when the depth of field ends, all objects become blurred.
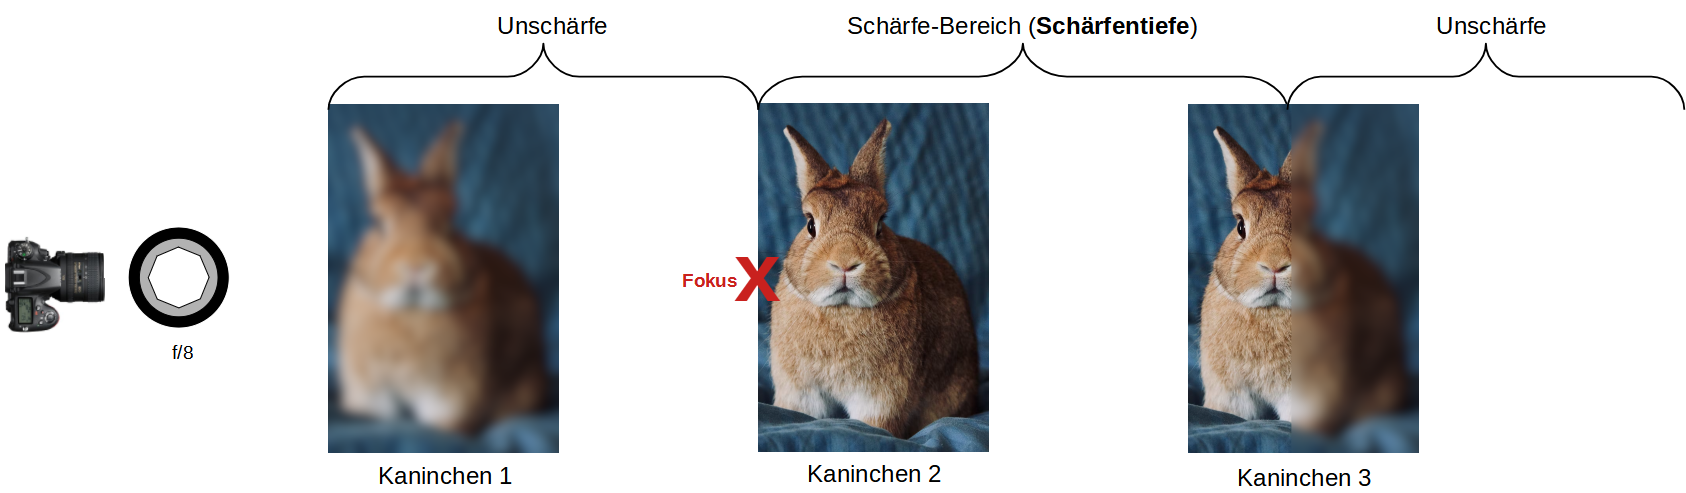
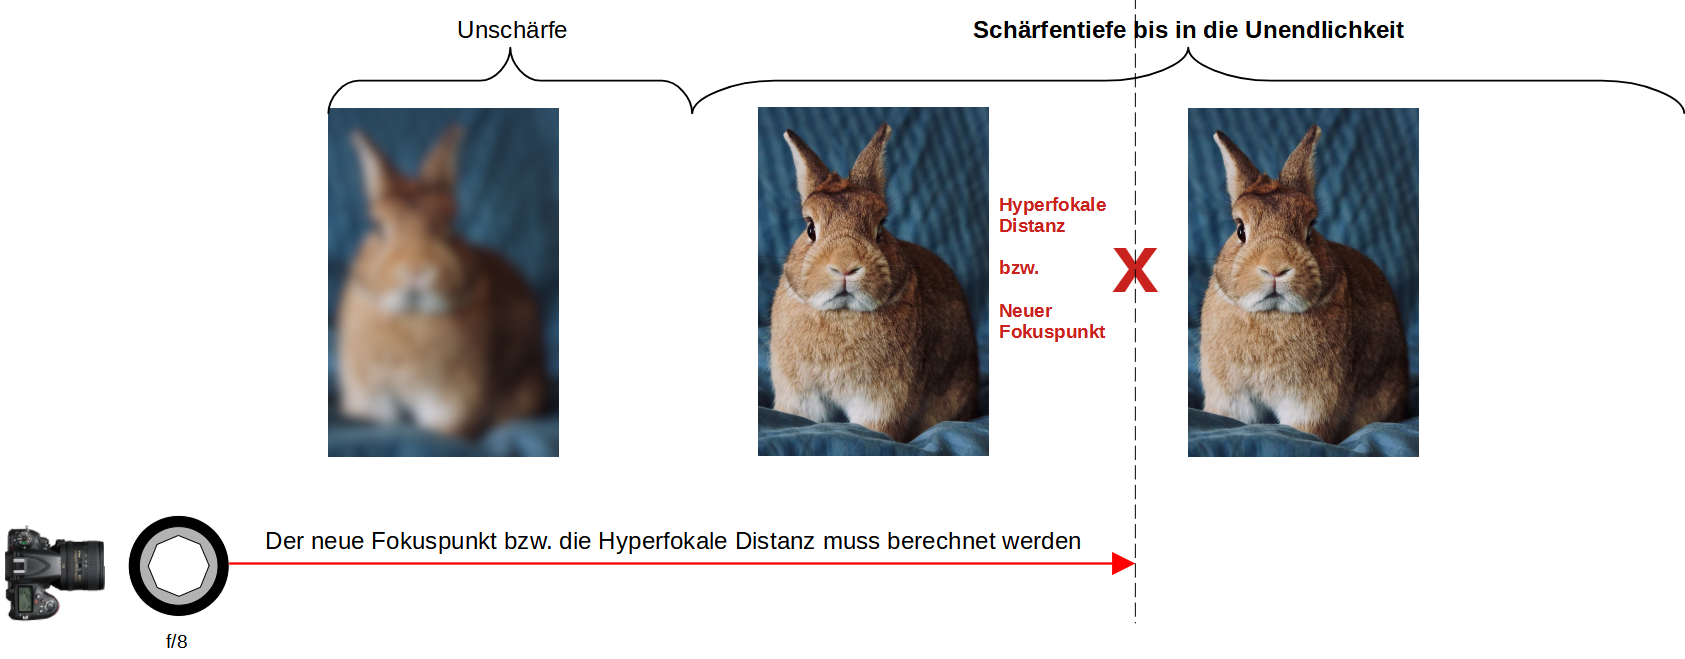
However, to render the second rabbit and all rabbits behind it, i.e., up to infinity, in focus, you must set the focus point to a previously calculated distance (hyperfocal distance):
To determine the hyperfocal distance, you can use a mobile app or a calculation table. For the calculation of the hyperfocal distance, you need to know your camera, the aperture, the focal length, and the approximate distance to the first object that should appear in focus. Within the app, I selected my camera and set the focal length to 35 mm. I selected aperture f/8 and additionally specified that I wanted to have all objects in focus from 10 meters onward.
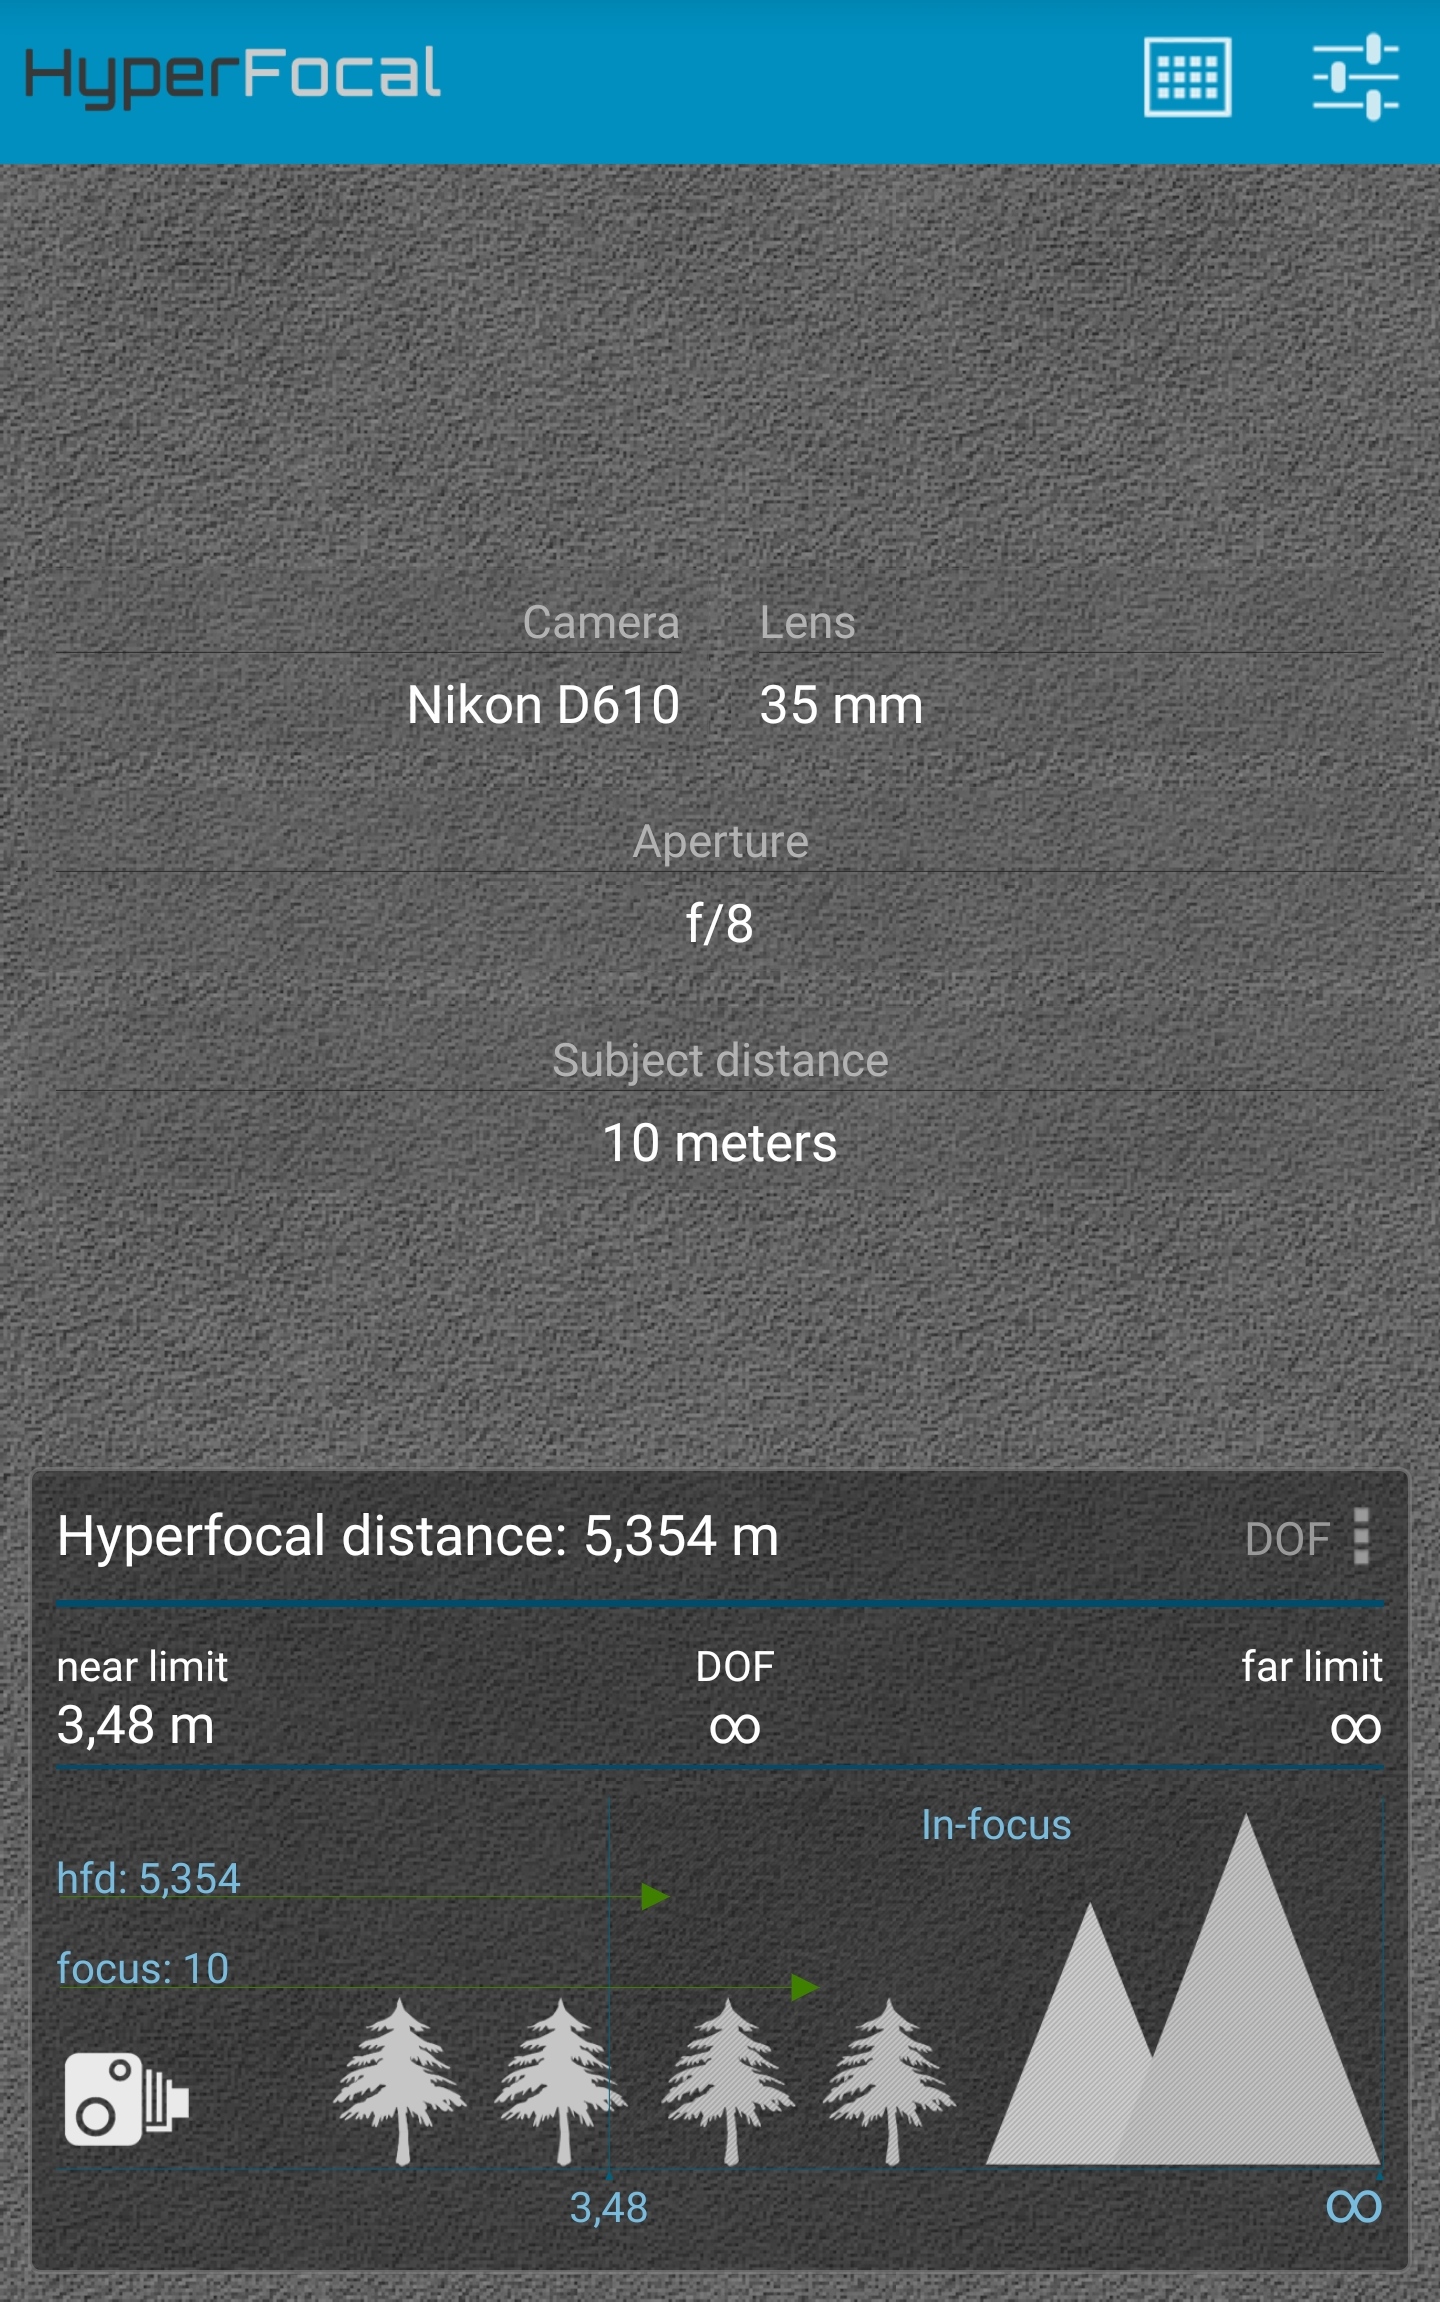
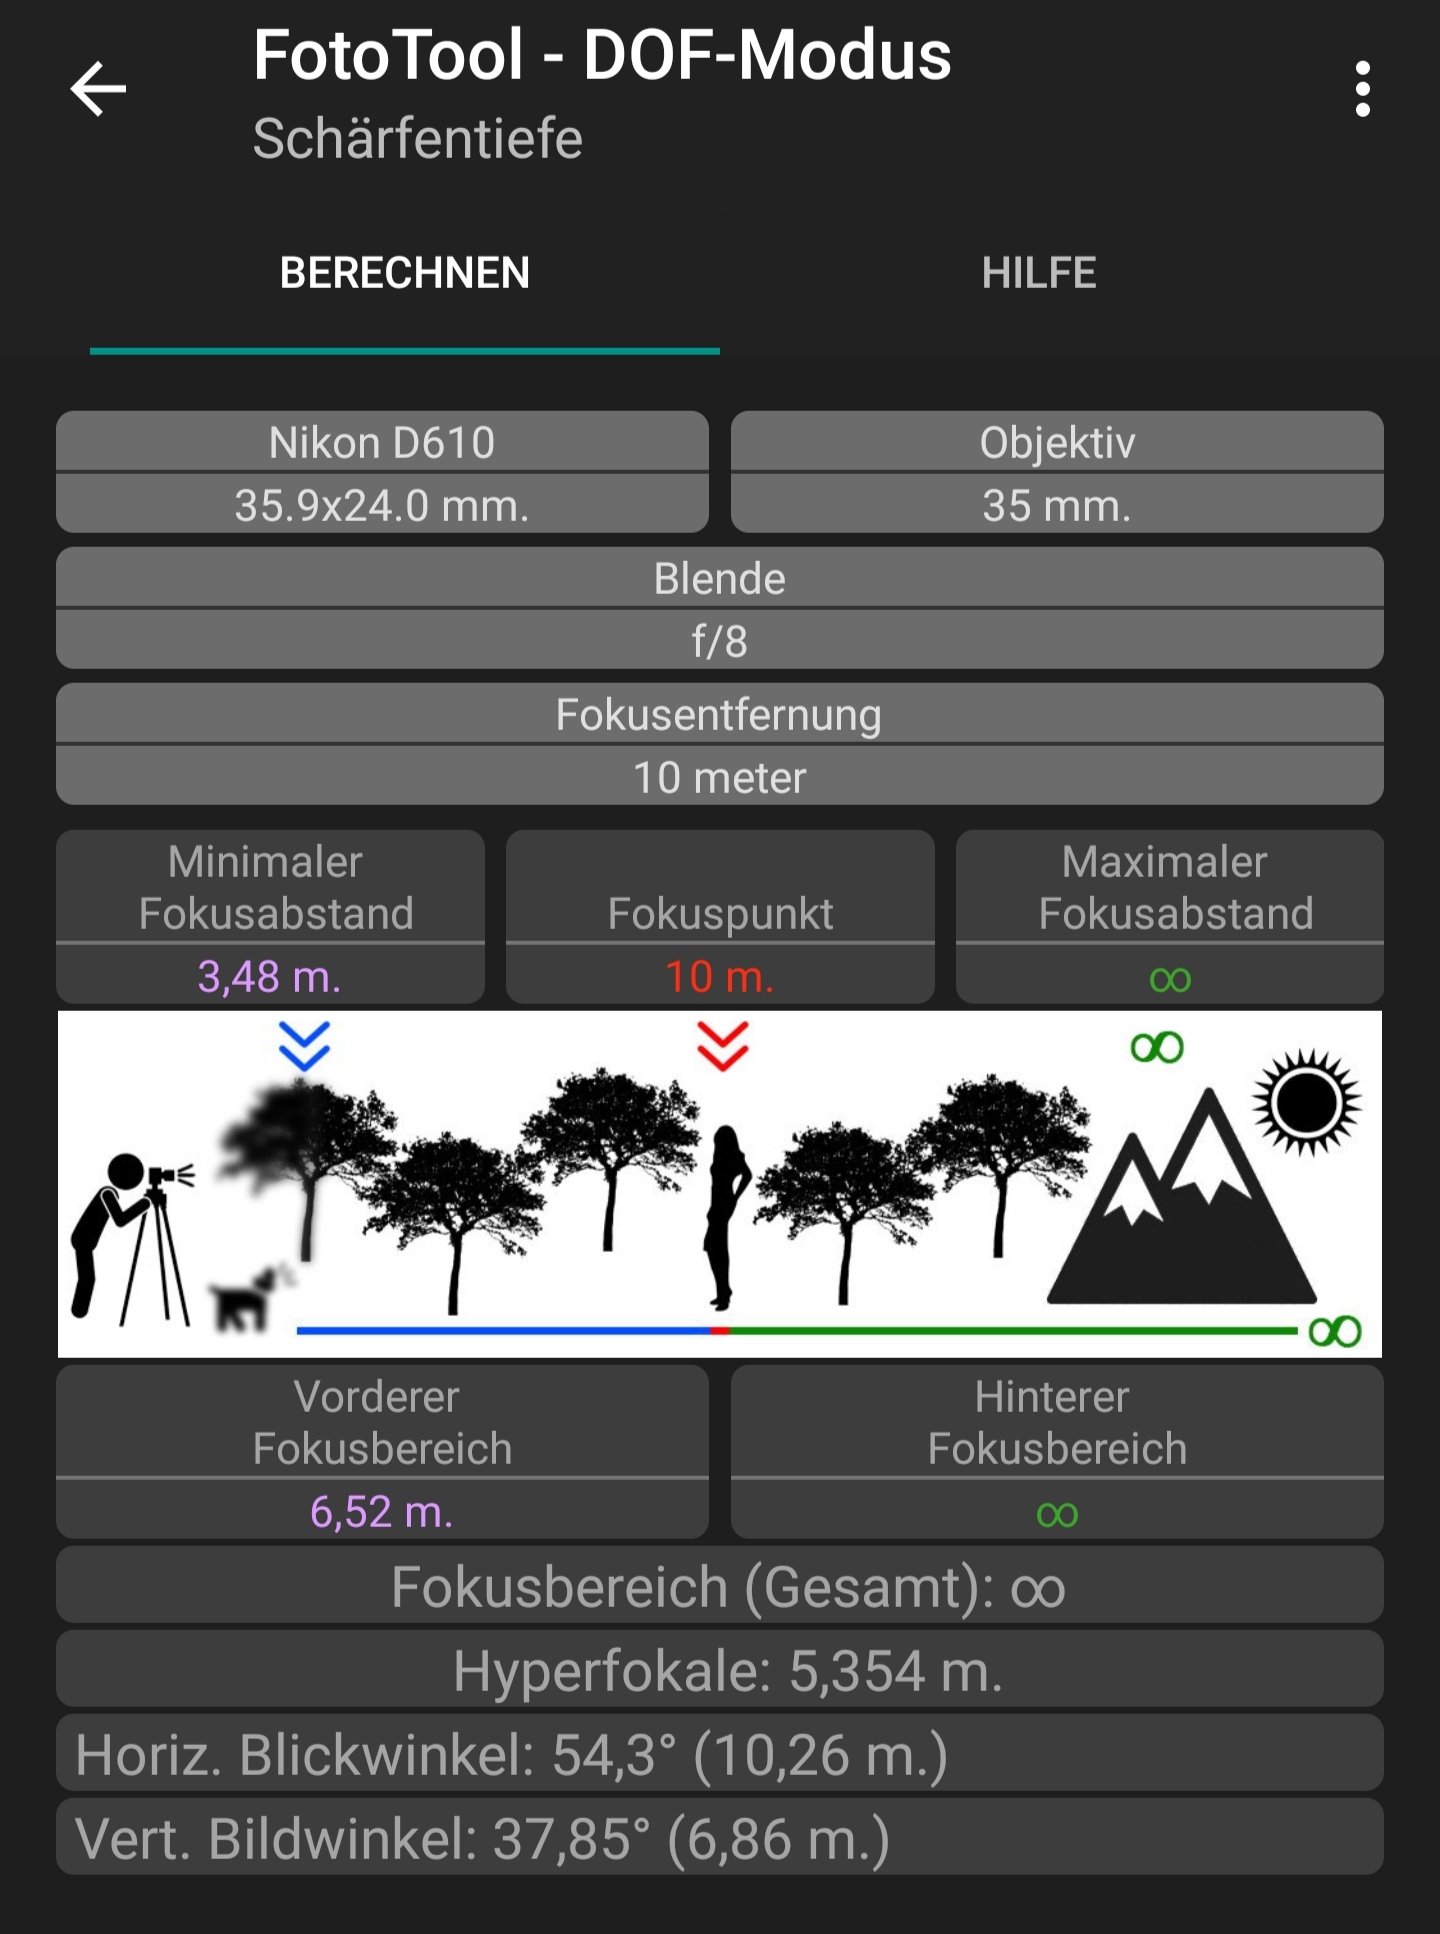
I performed the calculation with Excel: Excel Link
Both apps tell me that the hyperfocal distance, i.e., the new focus point, is at 5.354 meters, meaning I have to focus on a point at about 5.5 meters away:
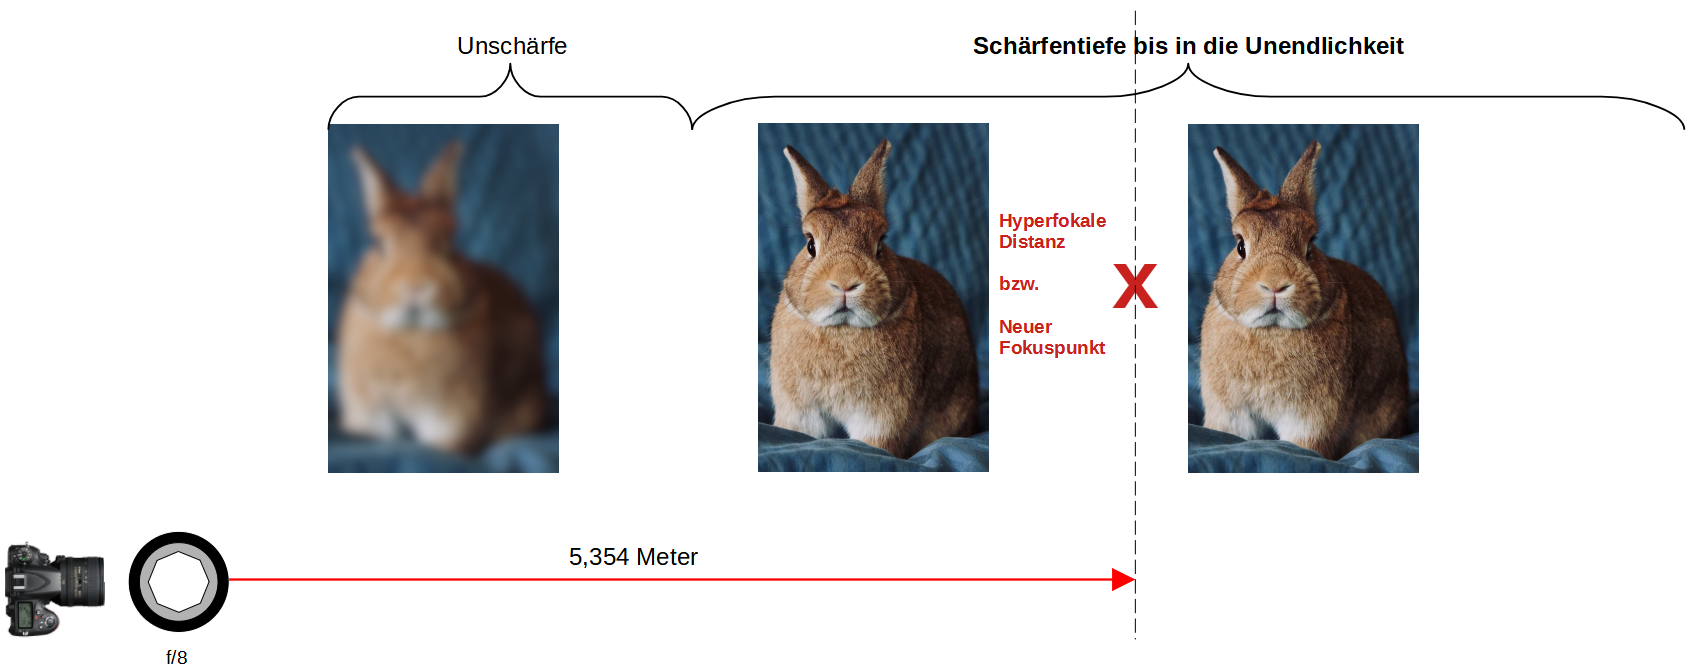
The hyperfocal distance also ensures that objects in front of the focus point, i.e., in this example from 3.48 m onward, are also shown in focus. Thus, the second rabbit is also rendered sharply.
Camera Filters
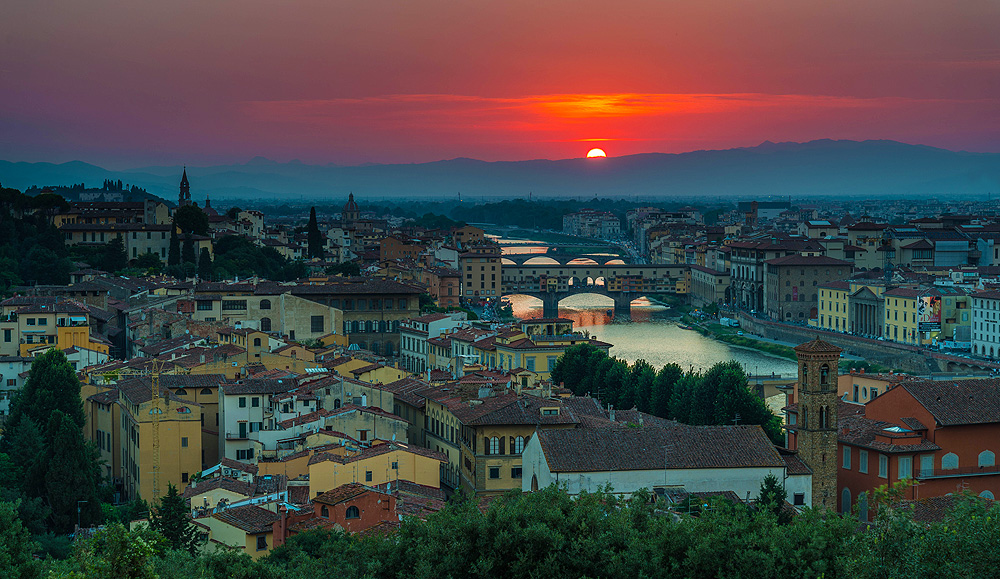
Anyone who wants to photograph a sunset has to shoot against the sun:
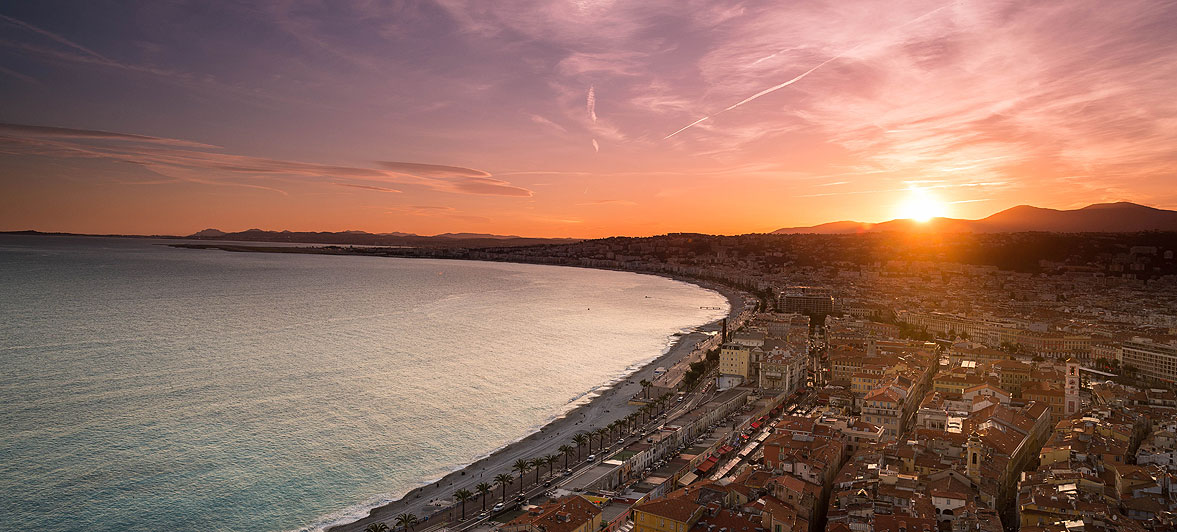
Without appropriate measures, the image will not look like the example but will be overexposed or the colors on the horizon will not come through properly. Therefore, you have to attenuate the sunlight with one or more filters.
I use the following filters:
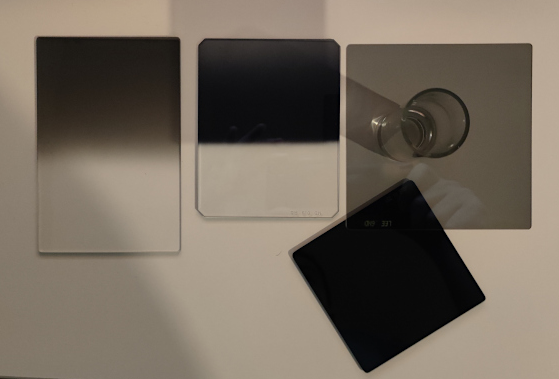
These can be attached to the lens with the appropriate adapter:

Here you can see an example of how someone photographed a sunset without a filter:
Due to the bright sun, the image is overexposed. The entire area in the middle is white. The image information is no longer present. Even with an image editing program, you cannot rescue this image. The photographer could have attenuated the sun beforehand with a filter system:
The photographer might also have needed to use multiple filters, e.g., one filter to darken the entire area or the entire image and an additional filter to darken the horizon.
By darkening, the image sensor receives less light, which is why the shutter speed must be increased. The filters also have the advantage that, due to the long shutter speed, I can capture more of the beautiful horizon colors. Since I sometimes expose the image sensor for several minutes and a sunset can change colors quite quickly, corresponding color gradients can appear in the image:
To get the photos even sharper, I made further settings on the camera:
- Enable mirror lock-up
- Set release mode to Mup (Mirror up) to raise the mirror beforehand
- In this setting, the shutter release responds to the previously set shutter speed
- On my camera, the shutter speed can be set to a maximum of 30 seconds. If I want to expose the image sensor longer, e.g., 5 minutes, I have to operate the shutter release manually. For this, I have to set the shutter speed to “b u l b”
- Disable long exposure noise reduction. I want to control the reduction myself afterwards.
- Disable integrated AF-assist light
- Shoot in RAW format
- Choose small image format or size
- I don’t want to print posters and therefore don’t need extremely high resolution
- My images have a maximum width of 1024 pixels online. So why should I set 16000px on the camera and then downsize the image. The downsizing (resampling) makes the image qualitatively worse
- If I set fewer pixels, I don’t have to expose unnecessary pixels. The aperture provides a certain amount of light and this light is needed for the required pixels
- Disable autofocus on the camera and lens and set focus manually
- Disable image stabilizer on the lens. In long exposure, the image stabilizer can cause blur.
My Nikon D610 camera settings are as follows:
- AUFNAHME -> ISO-Empfindlichkeits-Einst. -> Funktion der Karte im Fach 2 -> Sicherungskopie
- AUFNAHME -> ISO-Empfindlichkeits-Einst. -> Bildqualität -> NEF (RAW) + JPEG Fine
- AUFNAHME -> ISO-Empfindlichkeits-Einst. -> Bildgröße -> S
- AUFNAHME -> ISO-Empfindlichkeits-Einst. -> JPEG-Komprimierung -> Optimale Bildqualität
- AUFNAHME -> ISO-Empfindlichkeits-Einst. -> NEF-(RAW-)Einstellungen -> Farbtiefe für NEF (RAW) -> 14-bit
- AUFNAHME -> ISO-Empfindlichkeits-Einst. -> Farbraum -> sRGB
- AUFNAHME -> ISO-Empfindlichkeits-Einst. -> Rauschunterdr. bei Langzeitbelichtung -> OFF
- AUFNAHME -> ISO-Empfindlichkeits-Einst. -> Rauschunterdrück. bei ISO+ -> Normal
- AUFNAHME -> ISO-Empfindlichkeits-Einst. -> ISO-Empfindlichkeits-Einst -> ISO-Automatik -> OFF
- AUFNAHME -> ISO-Empfindlichkeits-Einst. -> Fernauslösung -> Ferngest. Spiegelvorauslösung
- INDIVIDUALFUNKTION -> a Autofokus -> a2 Priorität bei AF-S (Einzel-AF) -> Auslösepriorität -> OK
- INDIVIDUALFUNKTION -> a Autofokus -> a4 Messfeld-LED -> ON
- INDIVIDUALFUNKTION -> a Autofokus -> a5 Scrollen bei Messfeldauswahl -> Umlaufend
- INDIVIDUALFUNKTION -> a Autofokus -> a7 Integriertes AF-Hilfslicht -> OFF
- INDIVIDUALFUNKTION -> c Timer/Bel.-speicher -> c3 Selbstauslöser -> Selbstauslöser-Vorlaufzeit -> 2s
- INDIVIDUALFUNKTION -> c Timer/Bel.-speicher -> c4 Ausschaltzeit des Monitors -> 20s/1m/10s/10s/5m
- INDIVIDUALFUNKTION -> d Aufnahme & Anzeige -> d2 (Gitterlinien) -> ON
- INDIVIDUALFUNKTION -> d Aufnahme & Anzeige -> d3 (ISO-Anzeige und -Eistellungen) -> ISO-Empfindlichkeitsanzeige -> ON
- INDIVIDUALFUNKTION -> d Aufnahme & Anzeige -> d10 (Spiegelvorauslösung) -> 1s
- INDIVIDUALFUNKTION -> e Belichtungsreihe & Blitz -> e7 BKT-Reihenfolge -> unter / Messwert / überbelichten
- INDIVIDUALFUNKTION -> f Bedienelemente -> f1 OK-Taste (Aufnahmemodus) -> AF-Messfeld hervorheben -> OK
- INDIVIDUALFUNKTION -> f Bedienelemente -> f2 Funktionstaste -> BENUTZERDEFINIERTES MENÜ
- INDIVIDUALFUNKTION -> f Bedienelemente -> f4 AE-L/AF-L Taste -> Belichtung speichern ein/aus -> OK
- INDIVIDUALFUNKTION -> f Bedienelemente -> f7 Auslösesperre -> LOCK -> OK