What is Omniverse?
Omniverse is a platform from NVIDIA that allows you to create, connect, and simulate virtual 3D worlds – all in real time. Omniverse is an open platform for developers, designers, engineers, researchers, and creatives to:
Connect 3D applications (e.g. Blender, Maya, Unreal Engine)
Collaborate in a single scene – live and simultaneously.
Create physically realistic simulations and AI-driven applications.
What is Omniverse used for?
Design, visualization & simulation of objects such as vehicles in real time.
Digital twins of factories for process optimization.
Asset creation and visual simulations.
Training with synthetic data, e.g. for autonomous vehicles.
Real-time collaboration in animation and rendering.
What is USD?
Omniverse is based on Pixar’s OpenUSD format (Universal Scene Description) – a file format that can describe complex 3D scenes.
What is the Omniverse Kit SDK?
Omniverse Kit SDK is NVIDIA Omniverse’s development framework for creating custom 3D applications. At its core is the Kit Kernel, which manages lifecycles and serves as the runtime for extensions. The key concept is extensions: everything in Kit is modularized as an extension – from rendering to asset management to the UI. The Kit SDK provides a collection of base extensions (e.g. rendering, viewport, omni.ui for the user interface) and tools that developers can use.
NVIDIA describes the Kit SDK as:
“At its core, the Omniverse Kit SDK is a framework for efficiently managing extensions and plugins. It provides the tooling necessary for developers to assemble a blend of NVIDIA-provided and custom-developed extensions to create rich, full-featured applications.”
Simply put, the Kit SDK provides the building blocks and foundation for creating complete Omniverse applications using extensions. Many official Omniverse apps (such as USD Composer for 3D scene creation or Omniverse Code for extension development) are themselves based on the Kit SDK and use it to assemble their functionality.

Architecture of Omniverse Kit
Below you can see the Kit SDK (Kit Kernel and libraries), above it a custom Kit application with its .kit configuration file and extensions. On the left is the Extension Registry (extension catalog) with NVIDIA core extensions and sample extensions.
What is the Omniverse Kit App Template?
NVIDIA Omniverse Kit SDK and the Kit App Template are two closely related components for developing custom Omniverse applications. The Kit SDK serves as the fundamental software development kit – the framework on which Omniverse apps are built. The Kit App Template, on the other hand, is a project template repository provided by NVIDIA (on GitHub) that makes it easier for developers to get started with app development using the Kit SDK.
The Omniverse Kit App Template is a project template and tool set built on top of the Kit SDK. NVIDIA provides preconfigured templates and boilerplate code to quickly get your own Omniverse apps or extensions up and running. You can think of the Kit App Template as a head start: it delivers sample applications, folder structures, scripts, and a toolkit that automates common tasks (e.g. loading the Kit SDK or creating a basic UI).
When using the Kit App Template, you first clone the repository and then run a provided wizard. This “wizard” generates a new application or extension from templates of your choice.
This allows developers, for example, to create a minimal viewer app or a more complex editor app with just a few commands, without having to write everything from scratch. The Kit App Template abstracts much of the complexity and offers various starting points, including:
Kit Base Editor: A minimalist editor application with basic USD scene view.
USD Composer: A comprehensive template app for authoring complex OpenUSD scenes (similar to the official USD Composer app).
USD Viewer: A simplified viewer app (viewport only), ideal for streaming to a web browser.
Kit Service: A headless (no GUI) service application, e.g. for cloud backends.
For beginners, the Kit App Template is usually the better route. It reduces the initial effort and demonstrates best practices. Directly using the Kit SDK remains more suitable for advanced users or those with very specific control requirements.
How do I start an Omniverse application via the SDK?
To run the example from the video locally, we first need to download the Omniverse Kit SDK:
https://developer.nvidia.com/omniverse
You can get individual projects such as “Factory Planning 3D Sample Asset” from here:
https://developer.nvidia.com/usd#section-samples-and-examples
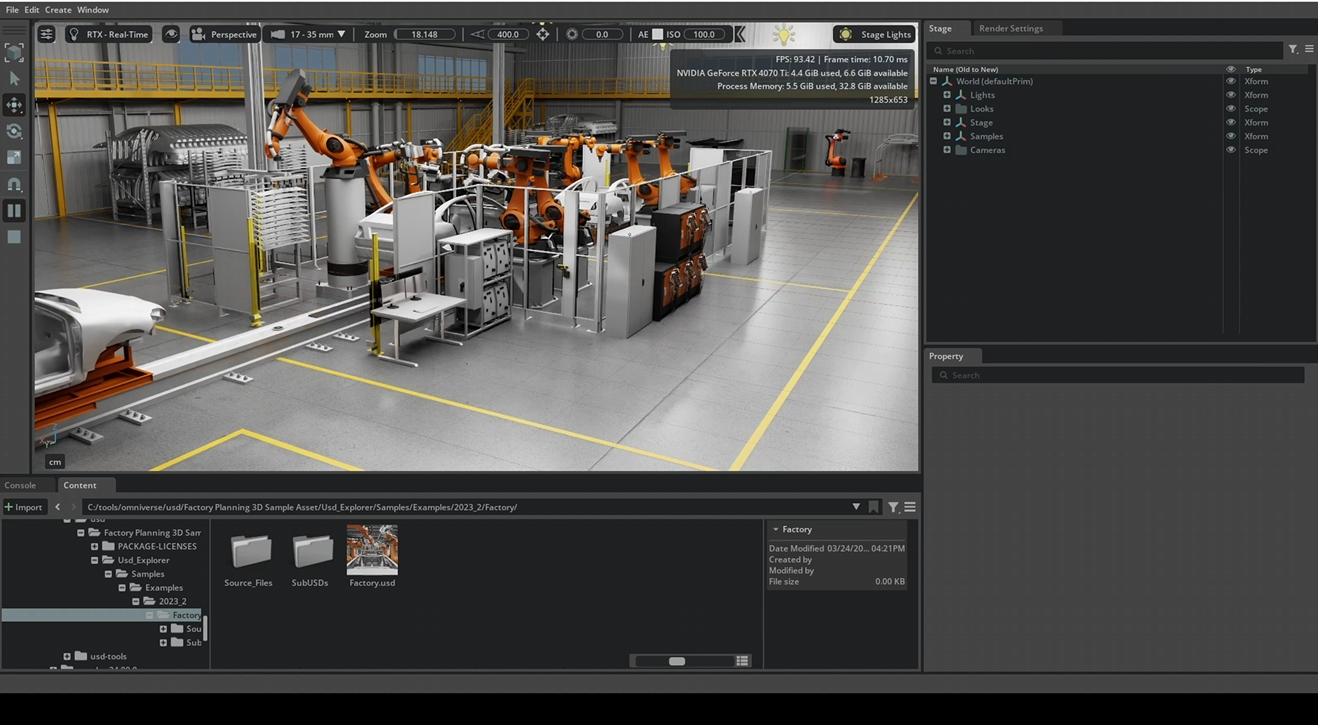
Next, we can run Omniverse locally and load the USD file of the factory:


Create a custom application/extension via the Omniverse Kit App Template
The necessary steps can be found on the following page:
https://github.com/NVIDIA-Omniverse/kit-app-template
Summary of the procedure on Windows to create a new project:
When creating a new project with the Omniverse Kit template, you can choose between two options:
Application: for a standalone, fully configurable Omniverse application – or
Extension: for a modular extension that adds new functionality to existing applications.

An application is a complete application based on Omniverse Kit. It is like its own program that brings together all desired extensions and configurations.
Application
Characteristics of an application:
Defines the main structure of an app.
Specifies which extensions to load.
Includes startup scripts, logos, window size, layouts, etc.
Can be run as a standalone application.
Is often configured via a .kit or .json file.
Use cases for applications:
A custom visualization environment for your industrial assets.
A specialized review tool for engineers or architects.
A custom app for AI-supported simulations or training.
Extension
An extension is a modular component that you can add to an existing Omniverse application. It extends functionality without altering the main application itself.
Characteristics of an extension:
Is written in Python/USD/C++.
Can provide UI elements, tools, panels, menus, logic, etc.
Is lightweight and easy to develop.
Can be enabled/disabled independently.
Is stored, for example, in kit/exts or extensions.
Use cases for extensions:
A UI window for uploading assets to the cloud.
A button to trigger a simulation.
An integration with an external service like Git, database, or MQTT.
Template
After selecting, for example, Application, you will be asked which template you want to use for your new application:

You now select one of several predefined application templates that serve as the foundation for your app. Each of these templates comes with specific extensions and features intended for particular use cases.
| Template-Name | Description |
|---|---|
| [kit_base_editor] | Minimal editor with basic functionality. Ideal as a starting point for your own app. Includes basic UI elements like windows, menus, logging, etc. |
| [omni_usd_composer] | Template for creative scenarios such as scene assembly, design, lighting. Includes tools for editing USD scenes, materials, cameras, etc. |
| [omni_usd_explorer] | Focus on navigation and inspection of USD files. No editing focus. Ideal for review tools. |
| [omni_usd_viewer] | Even more scaled-down than the Explorer. Pure USD viewer without interaction tools. Ideal for “view only”. |
| [kit_service] | For headless applications or server backends. No UI. Good for automated processes, services, or pipelines. |
*.kit & *streaming.kit
A .kit file (aaron_usd_composer.kit) is a configuration file in JSON format that defines how your Omniverse application is launched. It serves as the entry point for your application – comparable to a main() function in programming languages or a package.json in Node.js.

The *.kit file contains:
| Content | Description |
|---|---|
| app.exts | List of all extensions to be loaded |
| ui | Layout definitions, window sizes, themes |
| window | Window title, icon, size, fullscreen, etc. |
| files | Which scenes or assets to load at startup |
| logging | Log level, output format, paths |
| settings | Custom settings, environment variables, tokens, etc. |
In Omniverse Kit, so-called streaming layers enable an application to be extended with features for remote access and live visualization.
The file (aaron_usd_composer_streaming.kit) is a special configuration variant based on the main application that activates additional modules for pixel streaming and WebSocket communication.
It allows the application to be provided, for example, over the network or even in a browser – ideal for cloud environments, remote collaboration, or interactive demos.
By separating the main application from the streaming configuration, the architecture remains modular and flexible – depending on the need, the application can be started locally or streamed.
Locally, the files can be found, for example, in “C:\tools\omniverse\kit-app-template\source\apps”.
Setup Extension
The (aaron_usd_composer_setup_extension) is an automatically generated setup extension that ensures the app is correctly configured, initialized, and optionally extended. Here you can define the default behavior of the application or insert custom settings, workflows, or startup actions.

The setup extension contains:
| File | Purpose |
|---|---|
| extension.toml | Metadata (name, version, dependencies, paths) |
| main.py | Python script with your app’s startup logic |
| ui/, data/, scripts/ | Optional: assets, UI files, icons, etc. |
Locally, the folder can be found here:
C:\tools\omniverse\kit-app-template\source\extensions\aaron_usd_composer_setup_extension
Application Layer
Application layers in Omniverse are not to be confused with scene layers (as in USD or Photoshop); rather, they serve to separate configurations modularly and cleanly – similar to environment profiles in traditional software projects.
When you, for example, create an Omniverse application, you have a so-called main application that is stored in a .kit file. In your case, this file is called aaron_usd_composer.kit. It contains everything your application needs to run: the user interface, extensions, startup behavior, etc.
Now, however, you want your app to be able to be streamed – for example, to be displayed in a browser or controlled via WebSocket connections. For this, you need additional extensions and settings, such as a WebSocket interface, streaming modules, or network services.
However, these streaming functions are not written directly into your main app file – why? Because that would violate the principle of separating configuration and functionality. If you wrote everything into one .kit file, you would soon have an unwieldy construct of many functions that you might not need in every situation.
And this is exactly where application layers come into play.
An application layer such as omni_default_streaming.kit is a pre-defined configuration file from NVIDIA that exists solely to provide streaming functionality. It contains no app logic, no UI – only the relevant extensions and configurations needed for streaming.
So, when you are asked in repo.bat during app creation if you want to add “Application Layers” – and you, for example, select “omni_default_streaming” – then that means:
„Yes, I want to extend my main app with the ability to be streamed through this additional layer.“
The result is that a new .kit file is generated, for example aaron_usd_composer_streaming.kit. This file is nothing more than a combination of:
your main app (aaron_usd_composer.kit)
the selected application layer (omni_default_streaming.kit)
It is thus a “wrapper” that connects both .kit files via the extends declaration. That means: when you start aaron_usd_composer_streaming.kit, first your app is loaded and then the streaming layer is “overlaid.” This way your app gains all streaming capabilities – without you having to build them into the main configuration.
This separation has great advantages: you can start your application in different contexts, e.g. with or without streaming, or with a debug layer, or with a cloud layer – all without having to change the actual app file.
This is especially valuable if you want to deploy an app, for example, in different environments: locally during development, in the cloud for presentation, or on the corporate network for your team. You then only need to launch different .kit files, each composed of your app plus the appropriate layers.

Build Process
Before we can launch the Omniverse application with repo.bat launch, we first need to build it, i.e. compile or prepare it.

Afterwards, the new application can be started as follows:


When an application is created with the kit-app-template, the complete application resides within that folder. The entire kit-app-template folder thus represents the structure and framework of the application. It contains, among other things, the startup logic (apps/my_app.py), configuration files (config/*.kit), custom extensions (extensions/), as well as resources such as images, fonts, or shaders.
As a rule, each new project should use its own copy of the kit-app-template. This means: for each individual application or tool (e.g. USD Viewer, simulation GUI, material editor), the template folder is cloned and adapted to the respective requirements. This keeps each project isolated and independently configurable. It also allows you to control and version different startup options, extensions, and UI customizations in a targeted manner.
What is Nucleus?

Omniverse Nucleus is the central data server within the Omniverse ecosystem. It serves as a common platform for exchanging and managing 3D assets – particularly USD files, textures, materials, and references. Applications such as USD Composer, Isaac Sim, or custom Kit apps all access the same data via Nucleus to work collaboratively and consistently.
Its operation is conceptually similar to a cloud storage service like Dropbox, but it is specifically tailored to professional 3D workflows and the USD format. Instead of editing copies locally, all connected tools work directly on the server structure – either locally or on the network. Access is via the Omniverse URI scheme, e.g. omniverse://localhost/Users/username/scene.usd.
A key advantage of Nucleus is live collaboration: multiple applications – even different ones – can have the same scene open at the same time and synchronize changes almost in real time. Additionally, Nucleus supports versioning, permissions, reference resolution, and structured file management – essential for complex productions with many contributors.
Important: Nucleus is not intended for storing or versioning application code (e.g. Kit apps or Python scripts). Such development projects are kept locally and typically versioned with tools like Git or Subversion. However, applications can access files in Nucleus via omniverse:// paths – for example, to open, edit, or save USD scenes.
Installing Nucleus locally (e.g. via the Omniverse Launcher) allows individuals or small teams to run their own server. In enterprise environments, Nucleus can also be operated centrally on the network or as scalable cloud infrastructure. With its live-update behavior, structured storage, and native USD support, Nucleus is the key component for connected, dynamic 3D workflows.
Omniverse can be installed either locally as a Nucleus Workstation or in the cloud via Omniverse Enterprise (paid). For the local workstation, all users need to be on the same network or VPN, as direct file access is required. The cloud option offers more flexibility for distributed teams, but it requires a centralized, often containerized infrastructure.
Note: Nucleus can still be installed via the Omniverse Launcher until October 2025:
https://install.launcher.omniverse.nvidia.com/installers/omniverse-launcher-win.exe
Manipulating live USD scenes with Python
Next, an existing USD scene is modified via Python code – as if an external developer or an automated system were accessing a shared scene. The goal is to programmatically manipulate specific elements within the scene – for example, a cube – such as changing its scale. This approach is typical in collaborative projects where multiple contributors work on different aspects of a digital scene simultaneously, or in automated pipelines where scenes are regularly adjusted by scripts.
To programmatically edit scenes, the pxr module is used. This is Pixar’s Python bindings for the USD (Universal Scene Description) library. The module provides core functionalities such as loading and saving USD files, creating or modifying prims (scene elements), and setting transformations like position, rotation, or scale. Without pxr, accessing the contents of a USD file in Python is not possible.
A common misconception is the assumption that an external Python script can directly access an already running Omniverse application. In fact, a running application – for example, a custom app developed using the Kit App Template – is a separate process with its own memory context. When an external script like cube-scale.py is executed, it also starts its own process with a new USD stage. Even if both instances load the same .usd file, they are technically two completely separate worlds. Direct access to the internal scene of a running application is only possible through targeted interprocess communication (IPC), for example via sockets, shared memory, or remote procedure calls (RPC).
A simple yet powerful way to live-manipulate scenes is provided by USD Composer. This is an Omniverse application with a full graphical user interface, viewport, and built-in script editor. In this editor, Python scripts can be run directly while the scene is loaded. Changes to objects – such as scaling a cube – are immediately visible and can be saved permanently.


Even within custom applications based on the Kit App Template, such a script editor can be enabled. By default, it is not included in the base version but can be added via the app.toml configuration file. By adding the line “omni.kit.window.script_editor” = {} in the [dependencies] section, the script editor will be available the next time the app starts and can be opened via the “Window” menu. This allows scenes to be flexibly extended, tested, and modified in your own applications – directly at runtime and without the detour through external processes.
Omniverse Client Library Python API
The Omniverse Client Library (Python API) is an interface that allows developers to communicate directly from Python with the Omniverse file system and the NVIDIA Omniverse platform. It enables access to files and directories that are located locally or on an Omniverse Nucleus server, as well as subscribing to file changes, writing, reading, deleting, or checking access rights.
The API abstracts the underlying network protocol, allowing a unified treatment of local and remote resources. Developers can, for example, read USD files, retrieve metadata, or receive notifications when files change with just a few lines of code – regardless of whether the file is on a local drive, in the cloud, or on a Nucleus server.
The Omniverse Client Library is typically used in applications that work with digital assets: for example, tools in 3D design, simulation, AI training, digital twins, or in pipeline integration in studios. The Python API is particularly well-suited for quick automations, dashboards, content validation, or as part of larger workflows, for example in conjunction with Omniverse Kit.
The Omniverse Client Library Python API can be found at the following URL:
https://docs.omniverse.nvidia.com/kit/docs/client_library/latest/docs/python.html#
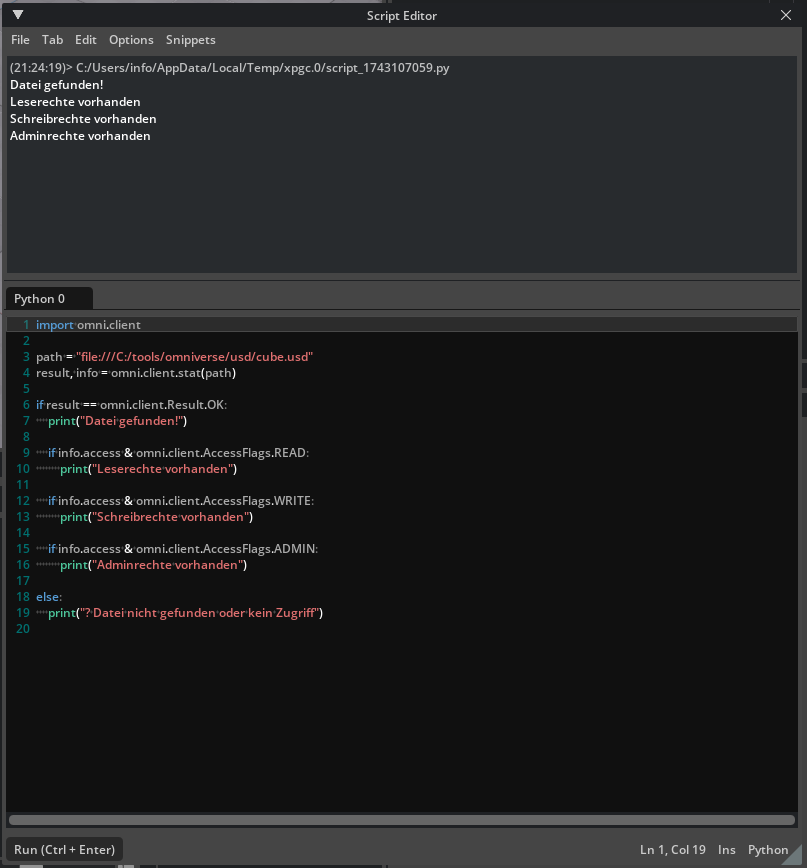
Example omni.client.AccessFlags
Display live sensor value in a 3D object
To display sensor data live in a 3D model, I combined several technologies: a physical sensor provides measurement data – for example, a rotary encoder that outputs values from -150 to +150. This sensor data is transmitted via the MQTT protocol to a local MQTT broker. In my case, I use Mosquitto. The sensor publishes its data at regular intervals (e.g. every second) to a specific MQTT topic, in my case: sensor/rotary_poti. The data consists of simple JSON payloads like { “value”: 42 }.
To monitor the data flow and obtain a graphical visualization outside of the 3D environment, I tapped the data in parallel in Node-RED. Node-RED allows me to subscribe to the MQTT topic via simple drag-and-drop logic flows and, for example, display the value on a dashboard. This allowed me to ensure that my sensor was sending correctly and that the MQTT broker was forwarding the data.
However, the central goal was to display the sensor data within a 3D world – that is, to have a 3D model react live to the sensor value. For this, I use NVIDIA Omniverse USD Composer.
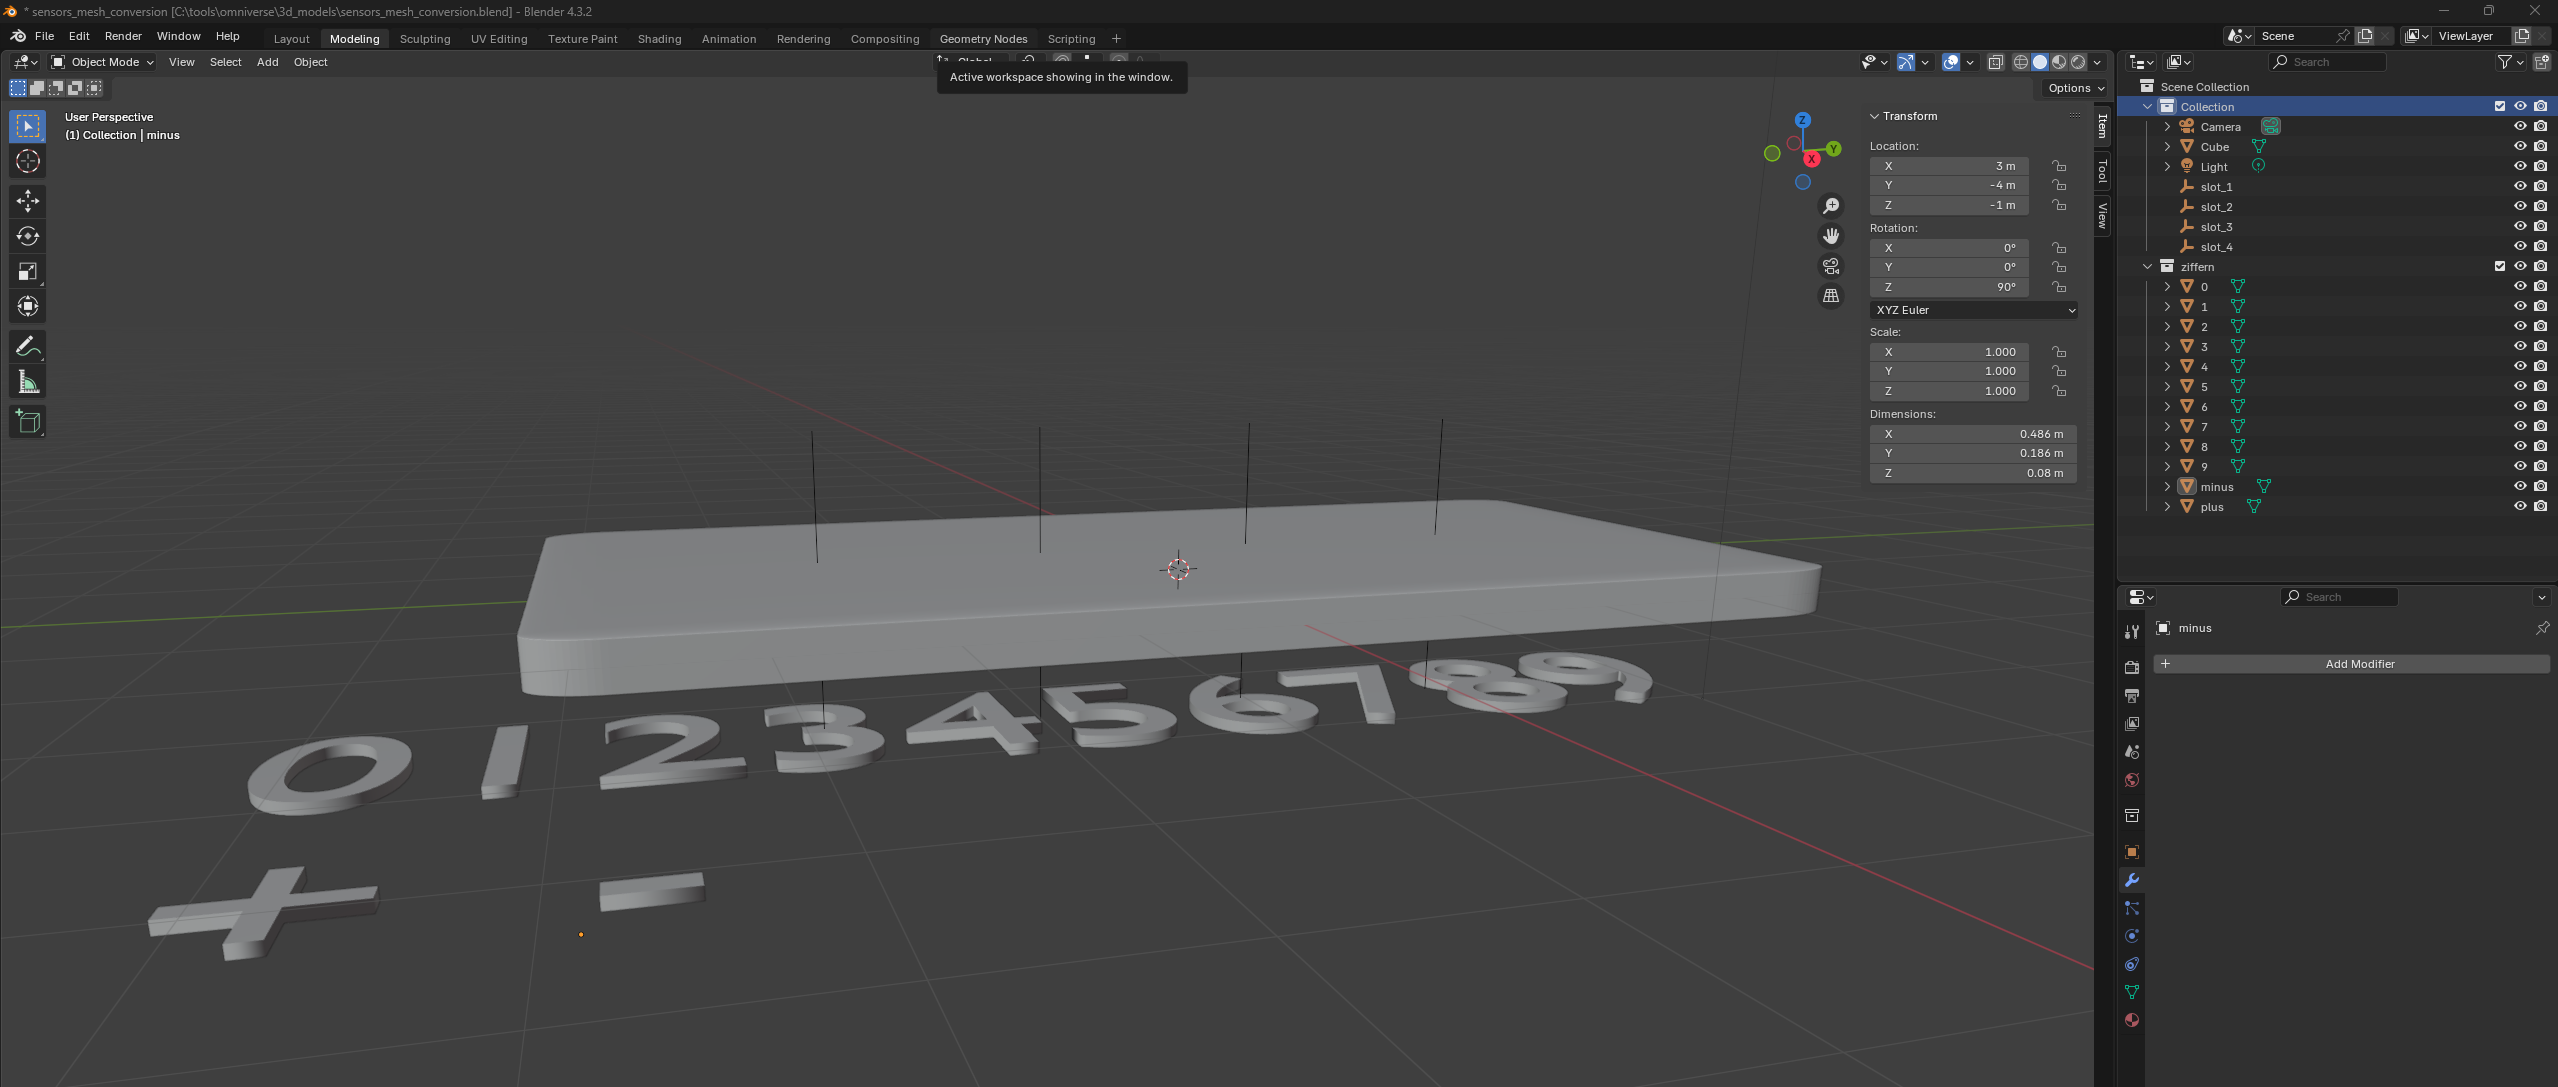
The 3D objects themselves – namely the digits 0 through 9 as well as the plus and minus signs – I originally modeled in Blender. In this setup, Blender acts as the modeling tool: it is used to create the shape of the digits and symbols once. The actual animation or display of these shapes is then handled by the Python logic in Omniverse, which copies, moves, and makes the objects visible as needed.
After modeling, I exported the objects to USD format or imported them into USD Composer.
The logic that makes these 3D objects visible and changes them dynamically is based on a Python script within Omniverse. This script is run in USD Composer’s internal script editor. It connects to the MQTT broker via a Python library (paho-mqtt) and subscribes to the topic sensor/rotary_poti. When a new value arrives, it is processed: the script calculates the sign and the individual digits from the value. For example, the value -128 is split into four elements: the minus sign and the digits 1, 2, and 8.
For each of these four positions (slots), the matching 3D model is loaded and repositioned within the scene. This means that the old digits are removed and replaced by new ones – depending on how the sensor value changes. The 3D objects are not only selected but also freely positioned and rotated to display them correctly on a surface, for example, on a green display plate. The positions and rotations are individually configurable for each character, allowing you to freely adjust the layout.
This demo shows how real measured values can be connected with digital twins or interactive 3D worlds.