Introduction
In this guide we set up an AI development environment with the NVIDIA TAO Toolkit. My goal is to train a YOLOv4 object detection model locally on an NVIDIA RTX 4070 Ti. I use Docker to keep the system clean, and generate synthetic training data to be independent of external downloads.
What is the NVIDIA TAO Toolkit?
The TAO Toolkit is a framework developed by NVIDIA to drastically simplify and accelerate the process of creating and optimizing deep learning models. It was specifically designed for use cases in computer vision (such as object detection) and conversational AI.
The key to TAO’s efficiency lies in its architecture, which enables the training of complex models using the concept of transfer learning.
Instead of training a complex model like YOLOv4 from scratch, a process that would often take months and require massive computational resources, the TAO Toolkit leverages the efficiency of pre-trained models. NVIDIA provides so-called pruning-capable models on its NGC platform, which have already been pre-trained on large general datasets like ImageNet (visual DB). These models thus possess a deep understanding of general image features such as edges, shapes, and textures. The goal is to adapt this already acquired knowledge. The model only needs to learn new specific details that concern the unique data, for example, synthetic training data or specific objects. This process, known as fine-tuning or transfer learning, dramatically reduces the need for new training data and the required compute time.
Setting Up Drivers & Docker
First, we need the graphics driver and the Docker engine.
We use the official Docker version, not Ubuntu’s, and install the NVIDIA Container Toolkit so that Docker can access the GPU.
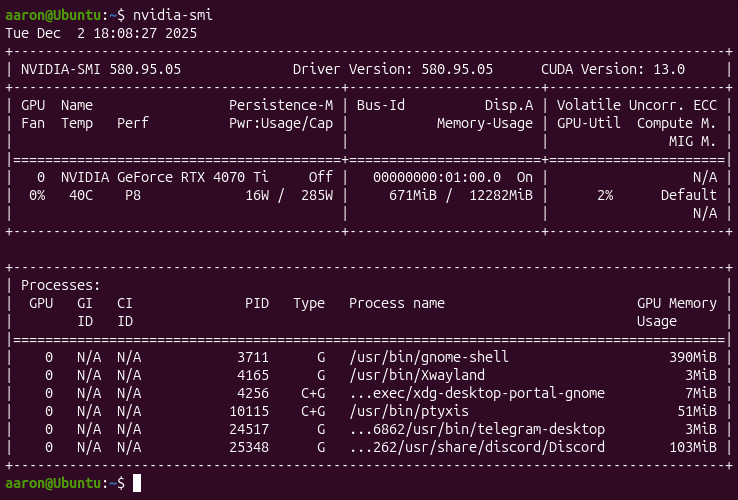
Checking the NVIDIA Driver
nvidia-smi
Installing Docker
Although Ubuntu offers a Docker package called docker.io in its standard repositories, for professional and modern AI development environments such as setting up the NVIDIA TAO Toolkit, installing the official Docker Community Edition (Docker CE), known as docker-ce, directly from the Docker repository is recommended. The main reason lies in currency and compatibility. The Ubuntu version (docker.io) is maintained by the Ubuntu developers, is often older, and follows the release cycle of the respective LTS version (e.g., Ubuntu 24.04). In contrast, the official version (docker-ce) is maintained directly by Docker (Mirantis) and contains the latest stable features and patches. For training AI models like YOLOv4, it is crucial that the Docker engine is up to date to ensure optimal integration and compatibility with the NVIDIA Container Toolkit.
# Prerequisites
sudo apt update
sudo apt install -y ca-certificates curl gnupg

# Add Docker GPG key & repo
sudo install -m 0755 -d /etc/apt/keyrings
curl -fsSL https://download.docker.com/linux/ubuntu/gpg | sudo gpg --dearmor -o /etc/apt/keyrings/docker.gpg
sudo chmod a+r /etc/apt/keyrings/docker.gpg

echo \
  "deb [arch=$(dpkg --print-architecture) signed-by=/etc/apt/keyrings/docker.gpg] https://download.docker.com/linux/ubuntu \
  $(. /etc/os-release && echo "$VERSION_CODENAME") stable" | \
  sudo tee /etc/apt/sources.list.d/docker.list > /dev/null

# Installation
sudo apt update
sudo apt install -y docker-ce docker-ce-cli containerd.io
Installing the NVIDIA Container Toolkit
The NVIDIA Container Toolkit (formerly known as nvidia-docker) is an interface and a set of tools that allow the Docker runtime environment (the “Runtime”) to start containers that can directly access NVIDIA GPUs. Without this toolkit, Docker would not see or be able to use the NVIDIA RTX 4070 Ti inside a container. The main purpose of the NVIDIA Container Toolkit is to provide the computing power of the NVIDIA graphics card to applications running in a Docker container.
The toolkit ensures that the container can see and use the necessary components to interact with the GPU. These include:
The NVIDIA drivers
The CUDA libraries
The CUDA libraries (Compute Unified Device Architecture) are an essential collection of software components that enable developers to harness the parallel compute power of NVIDIA GPUs.
# Add repo
curl -fsSL https://nvidia.github.io/libnvidia-container/gpgkey | sudo gpg --dearmor -o /usr/share/keyrings/nvidia-container-toolkit-keyring.gpg \
  && curl -s -L https://nvidia.github.io/libnvidia-container/stable/deb/nvidia-container-toolkit.list | \
    sed 's#deb https://#deb [signed-by=/usr/share/keyrings/nvidia-container-toolkit-keyring.gpg] https://#g' | \
    sudo tee /etc/apt/sources.list.d/nvidia-container-toolkit.list

# Installation & configuration
sudo apt update
sudo apt install -y nvidia-container-toolkit
sudo nvidia-ctk runtime configure --runtime=docker
sudo systemctl restart docker
Setting User Permissions
Normally, you would have to prepend sudo to your Docker commands every time, for example to start a container, which can be very cumbersome in a development environment with frequent use. To avoid this, we add the current user to the docker group. This group is created during the installation of the Docker engine and is the only non-root group authorized to communicate with the Docker daemon, which runs in the background with root privileges.
sudo usermod -aG docker $USER
newgrp docker
Testing GPU Integration in Docker
Next, we perform a functional test after installing the NVIDIA Container Toolkit. The goal is to verify that the Docker runtime environment successfully recognizes the NVIDIA RTX 4070 Ti and provides its resources to containers. Using the –gpus all flag instructs the Docker daemon to map all available GPUs of the host system, a functionality added by the Container Toolkit, into the container. At the same time, an official NVIDIA base image (nvidia/cuda:latest) that includes the necessary CUDA libraries and the nvidia-smi diagnostic tool is started. The nvidia-smi command is then executed inside the container. If the output of this command shows the details of your RTX 4070 Ti, the test is successful.
docker run --rm --runtime=nvidia --gpus all ubuntu nvidia-smi
Setting Up the TAO Environment
TAO is a Python launcher that controls Docker containers. We install it in a virtual environment (venv).
Creating the Python Environment
# Install tools
sudo apt install python3-venv python3-pip

# Create workspace
mkdir -p ~/tao_workspace
cd ~/tao_workspace

# Create and activate venv
python3 -m venv venv
source venv/bin/activate
Installing the TAO Launcher
The TAO Launcher package is a wrapper application or command-line tool that simplifies managing and running the actual NVIDIA TAO Toolkit. The launcher automatically handles the Docker images. Instead of typing long, error-prone Docker commands, the launcher provides a greatly simplified syntax. The launcher automatically pulls the correct, version-specific Docker image from the NGC registry, among other things. It starts the Docker container with the correct runtime parameters (like –gpus all and the necessary volume mounts), etc.
pip install nvidia-tao setuptools
Configuring Mounts (tao_mounts.json)
The term mount generally describes the process of creating a connection between the host system and the isolated Docker container. Volumes represent a specific type of mount. Working with the TAO Toolkit primarily relies on bind mounts. A bind mount links a specific directory on the host file system, for example, the local project folder, directly to a path in the container. This is essential so that training data can be accessed and model results can be permanently stored. In contrast, pure volumes are Docker-managed storage areas whose exact location on the host is irrelevant to the user. The need for the tao_mounts.json file arises because the TAO Toolkit uses bind mounts. Instead of specifying manual and complex paths with each command, the TAO launcher reads this JSON file. The file consistently defines which local project folders should be bound into the container as mounts. It thus automates the generation of the correct commands and ensures that the entire working environment is consistently available.
vi ~/.tao_mounts.json
{
    "Mounts": [
        {
            "source": "/home/aaron/tao_workspace/data",
            "destination": "/workspace/tao-experiments/data"
        },
        {
            "source": "/home/aaron/tao_workspace/results",
            "destination": "/workspace/tao-experiments/results"
        }
    ],
    "DockerOptions": {
        "shm_size": "16G",
        "ulimits": {
            "memlock": -1,
            "stack": 67108864
        },
        "user": "1000:1000",
        "network": "host"
    }
}
/home/aaron/tao_workspace/data & /workspace/tao-experiments/data
This is where the training data (images, annotations) are stored. The container accesses this folder in read mode to use the data for training the YOLOv4 model./home/aaron/tao_workspace/results & /workspace/tao-experiments/results
This path is used for storing results. The container writes the trained models, checkpoints, logs, and evaluation results to this host system folder. This ensures data persistence.
Logging into NVIDIA NGC
The NVIDIA GPU Cloud (NGC) is a central platform from NVIDIA that provides developers and researchers with a comprehensive collection of software and resources for deep learning, high performance computing (HPC), and data science. NGC provides the pre-trained models required for transfer learning with TAO. To access NGC, an API key is needed, which we must first create on the website.
docker login nvcr.io
# Username: $oauthtoken <-- do not enter the NGC username here ;)
# Password: <Your API Key>
Data Preparation
We create a folder structure and generate dummy data to test the pipeline.
mkdir -p ~/tao_workspace/data/training
mkdir -p ~/tao_workspace/results/specs
Generating Training Data (Python Script)
One might assume that in production for image recognition you must collect images of correct and defective objects to train an AI model. This corresponds to traditional data collection, where you record images directly on the assembly line for months, annotate them manually, and use them for training. This conventional approach is time-consuming and often inefficient due to the rarity of production defects in modern factories.
However, the approach with the NVIDIA TAO Toolkit deviates from this and uses synthetic training data, a method that is increasingly becoming the standard in Industry 4.0 and quality control.
The created Python script serves to generate synthetic training data and is a deliberate step away from downloading images directly from the internet. The reason is that downloading images, for example, of vehicles that later need to be classified as defective or correct, carries significant disadvantages. Such external data is often inconsistent in resolution, lighting, and perspective, and above all lacks the precise and reliable annotation of objects required for successful training with the NVIDIA TAO Toolkit. The biggest problem in industrial practice is that defect images are extremely rare since most production lines have high product quality. It would be extremely time-consuming and costly to collect enough defects for robust model training.
The reason why you do not simply use real images from the factory floor lies in the efficiency and reproducibility of the learning process, which is achieved through synthesis:
The requirement to see the correct objects is met in the synthetic approach by taking CAD models (digital blueprints) of the perfect objects and projecting them onto a gray canvas in the virtual world. This way, it is exactly known what the correct object looks like, and it can be generated in any desired position.
Synthetic data offers a massive advantage over real photos. When a model is rendered from the CAD plan onto a gray image, the system knows 100% exactly where the bounding box sits and which parts are occluded. This perfect annotation speeds up training tremendously.
Another crucial advantage is the ability to simulate the defect in a targeted manner and apply it in thousands of variations to the rendered perfect models, which is hardly possible in real production.
The gray canvas ensures that the model learns to recognize only the object itself and its defects, and is not distracted by changing lighting conditions, shadows, or blurred backgrounds on the production line.
import os
from PIL import Image

# Pfade
base_path = os.path.expanduser("~/tao_workspace/data/training")
img_dir = os.path.join(base_path, "image_2")
lbl_dir = os.path.join(base_path, "label_2")
os.makedirs(img_dir, exist_ok=True)
os.makedirs(lbl_dir, exist_ok=True)

# Dummy KITTI Label (Auto in der Mitte)
kitti_label = "car 0.00 0 0.00 200.0 100.0 400.0 300.0 1.5 1.6 3.5 0.0 0.0 10.0 0.0"

# 10 Bilder erstellen
for i in range(10):
    filename = f"{i:06d}"
    Image.new('RGB', (1248, 384), (100, 100, 100)).save(os.path.join(img_dir, f"{filename}.jpg"))
    with open(os.path.join(lbl_dir, f"{filename}.txt"), "w") as f:
        f.write(kitti_label)
print("Daten generiert.")
Installing and Running the Data Generation
pip install Pillow
python3 ~/tao_workspace/data/training/generate_data.py
The pip install Pillow command installs the Pillow library, one of the most important image processing libraries for Python. This library is necessary so that the following script can generate and manipulate image files in the required format. Pillow thus provides the technical tool to create the blank canvas for the synthetic data. The python3 ~/tao_workspace/data/training/generate_data.py command then starts the execution of the previously created Python script. The script begins executing the defined logic for data generation. As a result, the synthetic, neutral base images, the gray placeholders, are created in the defined quantity and saved to disk. This step completes the preparation of the image files that serve as the necessary basis for inserting the three-dimensional object models in the following workflow.
TFRecords and the Specification File
The TAO Toolkit is designed to process data in the TFRecords format, which is the optimized binary format of Google’s TensorFlow framework. This format is necessary because it stores and reads the training data (the generated images and their perfect annotations) so efficiently that GPU utilization is maximized. TFRecords enable faster data processing during training compared to individual image files and CSV annotation files, which is crucial for GPU-accelerated transfer learning on the RTX 4070 Ti. To convert the images into this specialized binary format, a specification file (Spec file), in this case convert_spec.txt, is required. Spec is short for specification and refers to a simple text configuration file that tells the TAO launcher and the conversion script exactly which files should be copied where, what the source format is (e.g., images and annotations), and which parameters apply for the conversion into TFRecords. The spec file thus serves as the central directive for the conversion process to ensure an error-free and reproducible transformation of the source data into the optimized TFRecords format.
vi ~/tao_workspace/results/specs/convert_spec.txt
kitti_config {
  root_directory_path: "/workspace/tao-experiments/data/training"
  image_dir_name: "image_2"
  label_dir_name: "label_2"
  image_extension: ".jpg"
  partition_mode: "random"
  num_shards: 2
  val_split: 20
  num_partitions: 2
}
Command to convert:
tao model yolo_v4 dataset_convert \
  -d /workspace/tao-experiments/results/specs/convert_spec.txt \
  -o /workspace/tao-experiments/data/tfrecords/kitti_train \
  -r /workspace/tao-experiments/results/
The command performs the conversion of the prepared data into the TFRecords format. The result of this conversion is the creation of multiple optimized binary files in TFRecords format. These files are stored in the specified output directory on the host system, which is mounted in the container as /workspace/tao-experiments/data/tfrecords/kitti_train and on the local disk as the corresponding mounted directory. Each of these binary files contains all the training information in a TensorFlow-optimized stream, including the synthetic gray images with the rendered objects as well as their annotations, the perfectly annotated bounding boxes and labels. The result of this step completes the data preparation phase, as the generated TFRecords files form the final training basis for the YOLOv4 model. This optimized format can be read extremely quickly and efficiently from disk by the training algorithm in the next steps of the TAO workflow, ensuring maximum GPU utilization.
Training (YOLOv4)
YOLOv4 stands for You Only Look Once version 4 and represents a highly advanced architecture for real-time object detection. Unlike older methods, YOLOv4 performs both object classification and bounding box localization in a single pass through the neural network. This enables the extremely high processing speed required for industrial applications such as defect detection on production lines. For this use case, the TAO Toolkit uses the model with ResNet18 as the backbone architecture, a smaller and more efficient network structure that is ideal for transfer learning since it has already been pre-trained well on general image data. The created file yolo_v4_train_resnet18_kitti.txt is the main configuration file or spec file for the TAO launcher and is absolutely essential for training the YOLOv4 model. It defines all the hyperparameters and paths that the container needs during the training process. The configuration specifies which learning rate to use, how large the batch size is, how many epochs to train for, and which optimization method to employ. Additionally, the spec file tells the TAO Toolkit where the TFRecords data generated in the previous step are located and in which folder the training results should be saved. It thus controls the entire transfer learning process from data input to the storage of the trained model.
Creating the Spec File
random_seed: 42
yolov4_config {
  big_anchor_shape: "[(114.94, 60.67), (159.06, 114.59), (297.59, 163.17)]"
  mid_anchor_shape: "[(42.99, 31.91), (79.57, 31.75), (56.80, 56.93)]"
  small_anchor_shape: "[(15.60, 13.88), (30.25, 20.25), (27.03, 40.12)]"
  box_matching_iou: 0.25
  matching_neutral_box_iou: 0.5
  arch: "resnet"
  nlayers: 18
  arch_conv_blocks: 2
  loss_loc_weight: 0.8
  loss_neg_obj_weights: 100.0
  loss_class_weights: 1.0
  label_smoothing: 0.0
  big_grid_xy_extend: 0.05
  mid_grid_xy_extend: 0.1
  small_grid_xy_extend: 0.2
  freeze_bn: false
  force_relu: false
}
training_config {
  batch_size_per_gpu: 8
  num_epochs: 80
  enable_qat: false
  checkpoint_interval: 10
  learning_rate {
    soft_start_cosine_annealing_schedule {
      min_learning_rate: 1e-6
      max_learning_rate: 5e-4
      soft_start: 0.1
    }
  }
  regularizer {
    type: L1
    weight: 3e-5
  }
  optimizer {
    adam {
      epsilon: 1e-7
      beta1: 0.9
      beta2: 0.999
      amsgrad: false
    }
  }
}
eval_config {
  average_precision_mode: SAMPLE
  batch_size: 8
  matching_iou_threshold: 0.5
}
nms_config {
  confidence_threshold: 0.001
  clustering_iou_threshold: 0.5
  top_k: 200
}
augmentation_config {
  hue: 0.1
  saturation: 1.5
  exposure: 1.5
  vertical_flip: 0
  horizontal_flip: 0.5
  jitter: 0.3
  output_width: 1248
  output_height: 384
  output_channel: 3
  randomize_input_shape_period: 0
  mosaic_prob: 0.5
  mosaic_min_ratio: 0.2
}
dataset_config {
  data_sources: {
    tfrecords_path: "/workspace/tao-experiments/data/tfrecords/kitti_train*"
    image_directory_path: "/workspace/tao-experiments/data/training"
  }
  include_difficult_in_training: true
  image_extension: "jpg"
  target_class_mapping {
    key: "car"
    value: "car"
  }
  validation_data_sources: {
    tfrecords_path: "/workspace/tao-experiments/data/tfrecords/kitti_val*"
    image_directory_path: "/workspace/tao-experiments/data/training"
  }
}
Renaming Files (Fix for Validation)
The converter creates files named …fold-000…, but the spec file looks for kitti_val. We rename them:
cd ~/tao_workspace/data/tfrecords
for f in *fold-000*; do mv "$f" "${f/kitti_train/kitti_val}"; done
cd ~/tao_workspace
Starting the Transfer Learning
After all preparations are complete, we now execute the command that starts the actual transfer learning on the NVIDIA GPU. This command is the culmination of the workflow so far and instructs the TAO launcher to start the previously downloaded and optimized YOLOv4 Docker image. The created spec file yolo_v4_train_resnet18_kitti.txt is passed as the central configuration. The launcher reads this specification and mounts the TFRecords training data and the results folder into the container. The training is then initialized inside the container. The pre-trained ResNet18 backbone of the YOLOv4 model is loaded and begins adjusting the weights based on the synthetically generated and TFRecords-optimized data. The entire computational load is handled by the RTX 4070 Ti, with the NVIDIA Container Toolkit ensuring efficient communication between the deep learning framework and the GPU. During training, checkpoint files are generated at regular intervals and saved in the mounted results folder, representing the current learning progress of the model. These checkpoints are later used for evaluation and exporting the final model. With this command, the phase begins in which the model learns to reliably distinguish defective from correct objects.
tao model yolo_v4 train \
  -e /workspace/tao-experiments/results/specs/yolo_v4_train_resnet18_kitti.txt \
  -r /workspace/tao-experiments/results/train_run_1 \
  -k my_key \
  --gpus 1
Expected Output:
Epoch 1/80
1/1 [==============================] - 21s 21s/step - loss: 2165133.0000
...
Epoch 80/80
1/1 [==============================] - 0s 215ms/step - loss: 349471.9688
Execution status: PASS
Exporting the Model to ONNX Format
After the successful completion of the transfer learning, the trained YOLOv4 model must be converted into a format suitable for production deployment. The export command serves exactly this purpose. It instructs the TAO launcher to load the generated model and convert it into ONNX format. ONNX, Open Neural Network Exchange, is an open standard that enables the exchange of deep learning models between different frameworks and runtime environments. By exporting to ONNX, the model becomes framework-agnostic and can be loaded into engines such as NVIDIA TensorRT. TensorRT further optimizes the model for maximum performance and minimal latency on NVIDIA GPUs. This is a crucial step for use in real-time applications like NVIDIA DeepStream, which is often used for video analytics and image processing in production. The result of the export command is a final model file in ONNX format, ready for integration into the target system and marking the beginning of the model deployment phase.
tao model yolo_v4 export \
  -m /workspace/tao-experiments/results/train_run_1/weights/yolov4_resnet18_epoch_080.hdf5 \
  -k my_key \
  -o /workspace/tao-experiments/results/yolo_v4_resnet18_epoch_080.etlt \
  -e /workspace/tao-experiments/results/specs/yolo_v4_train_resnet18_kitti.txt
After the entire local AI training pipeline has been successfully set up, the user can start their own projects. This requires only swapping the synthetic images for their own photos. For annotating objects on these own photos, it is then recommended to use an external tool such as labelImg for the annotations.