In this post, I explain how you can use Whisper, an AI-based tool from OpenAI, for automatic transcription of videos. Whisper is capable of accurately converting spoken language in various languages – including German – into text. This makes it ideal for transcribing, for example, interviews, lectures, or personal videos.
Install Python 3.10
Whisper requires the Python programming language and needs a version between 3.7 and 3.10. In this guide, we use Python 3.10 to avoid compatibility issues.
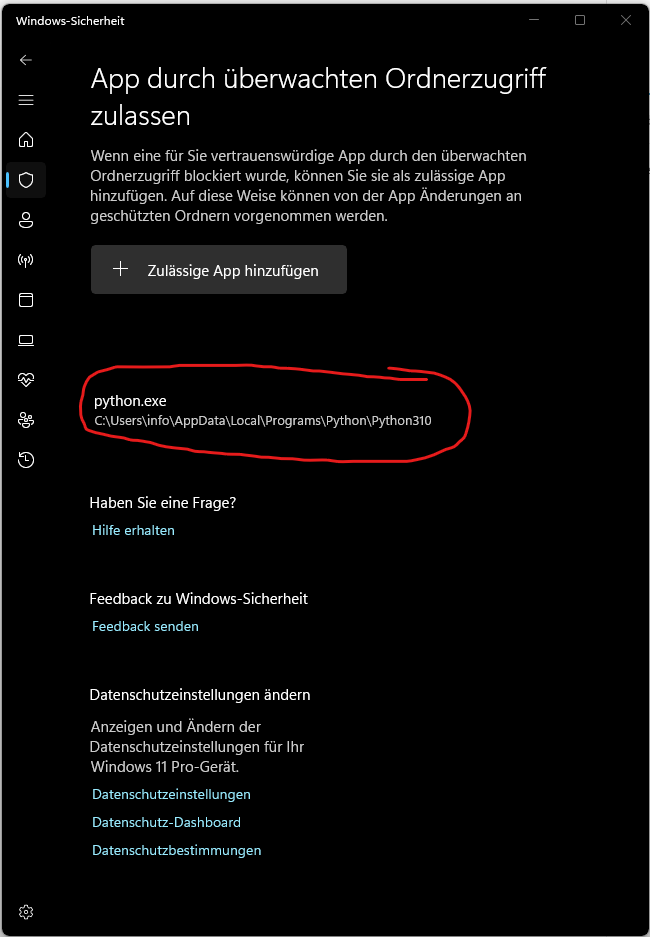
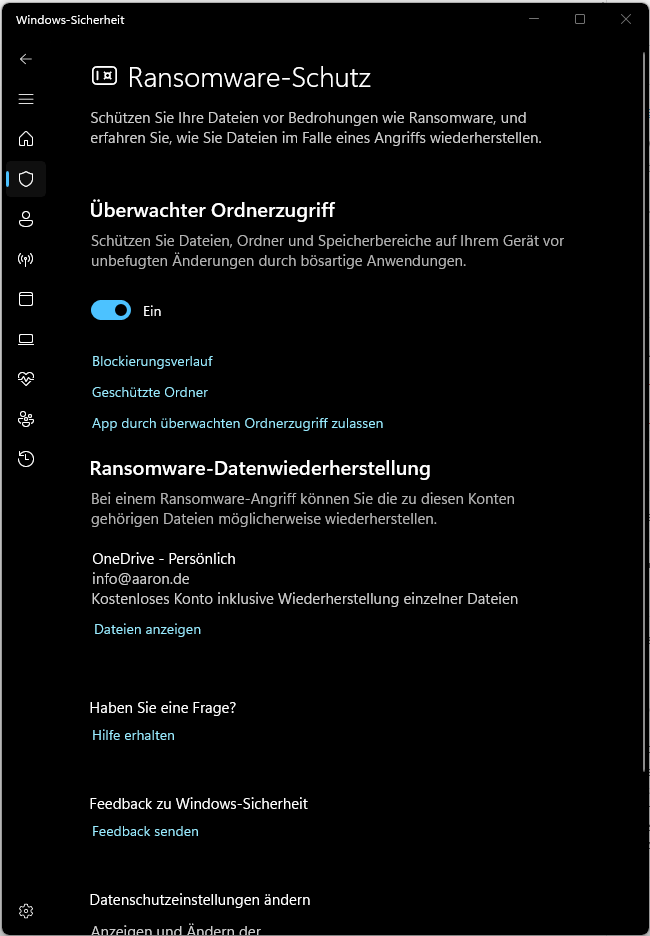
If Windows Security blocks the execution of python.exe, you can manually add Python as an allowed app:

Set up a virtual environment (whisper-env)
Whisper requires various libraries (such as torch for machine learning, ffmpeg for audio processing, and some other Python packages). If you install these packages directly in your global Python environment, they could conflict with other projects that might require different versions of these libraries. A virtual environment keeps all necessary dependencies separate so that they apply only to Whisper.
Now create the virtual environment named whisper-env in the project folder, which will create a new folder named whisper-env in the project directory that contains the isolated Python environment where all packages for Whisper will be installed.
To use the virtual environment, you need to activate it. After activation, the prompt shows (whisper-env), indicating that the virtual environment is active. All subsequent Python commands (e.g. pip install) apply only to this environment as long as it is active.
You can now install Whisper and all necessary dependencies into the virtual environment without affecting your global system.
If errors occur during installation, you may be missing additional dependencies or tools. You can install these as follows:
If you encounter an error message regarding script execution, adjust the PowerShell security policy:
Install ffmpeg and add to the system pathx
Whisper requires ffmpeg to extract audio from video files. Here are the steps to install ffmpeg. You can download the required file “ffmpeg-release-essentials.zip” from the official website. Then you must add the bin folder (C:\tools\ffmpeg-7.1-essentials_build\bin) to the PATH environment variable. You can then display the ffmpeg version as follows:
Use Whisper for transcription
In the previously created project folder “whisper”, I created the following folders:
- source: This folder contains the video files to be transcribed.
- transcript: This is where the finished transcript is saved.
- whisper-env: This is the folder containing the virtual environment in which Whisper was installed.
With the following command you can transcribe the file Video1.mkv from the source folder and save the transcript without timestamps in the transcript folder.
"C:\Users\Benutzername\Videos\whisper\quelle\Video1.mkv": The path to the video file to be transcribed.--language German: Specifies that the video is in German so that Whisper uses the correct language.--output_format txt: Saves the transcript as a plain text file (.txt) without timestamps.--output_dir "C:\Users\Benutzername\Videos\whisper\transkript": Specifies that the text file will be saved in the transcript folder.
Deactivate the virtual environment
After completing the transcription, you can deactivate the virtual environment. Just enter the following command:
Automated transcription of multiple videos
If you have multiple video files in the same folder and want to automatically transcribe them without reprocessing files that have already been processed, you can use the following Python script. The script scans a specified folder for new or changed video files, transcribes them, and saves the results as text files in a target folder. The transcripts have the same names as the video files and contain only the plain text without timestamps. An additional history file ensures that videos already processed are skipped in the next run. This way, you can run the script regularly and it will automatically process only the relevant files.
Run the script with the following command:
Using Whisper with the large model and GPU support
In this section, you’ll learn how to optimally use Whisper’s large model on your NVIDIA GPU to achieve the best transcription accuracy while maximizing speed. Since the large model is computationally intensive, using a GPU can significantly accelerate processing.
Before we dive into the details, some basic terms need to be clarified.
What is PyTorch (or torch)?
PyTorch is an open-source machine learning library primarily developed by Facebook AI. It provides a wide range of tools and algorithms for deep learning and is used in the Python programming language.
In your case, Whisper uses PyTorch in the background as a “backend” to perform the complex calculations for transcribing audio to text. When you install and use Whisper, PyTorch is automatically loaded in the background – so you don’t need to deal with PyTorch directly, only ensure that it is installed correctly.
What is torch?
torch is the package name for PyTorch in Python. That means when you see import torch in Python code, it refers to the PyTorch library. The name “torch” is used because PyTorch is imported under this package name in Python.
What is CUDA?
CUDA (Compute Unified Device Architecture) is a technology and programming interface developed by NVIDIA. It enables programs like PyTorch to use the computational power of an NVIDIA GPU. GPUs are particularly powerful for parallel computations because they can perform many operations simultaneously. When a model like Whisper needs to process large amounts of data, CUDA can significantly reduce computation time by using the GPU for calculations.
For PyTorch, this means it can use CUDA to run calculations on an NVIDIA GPU instead of the CPU, provided such a GPU is available and PyTorch is installed with CUDA support.
Installing PyTorch with CUDA support
For your GPU to be usable by Whisper, PyTorch must be installed with CUDA support. Without CUDA, PyTorch would use only the CPU, which is slower. Run the following command in the console to install PyTorch with the appropriate CUDA version:
To ensure that PyTorch is installed with CUDA support and the GPU is recognized, you can run the following Python script. It checks if CUDA is available and displays the GPU information.
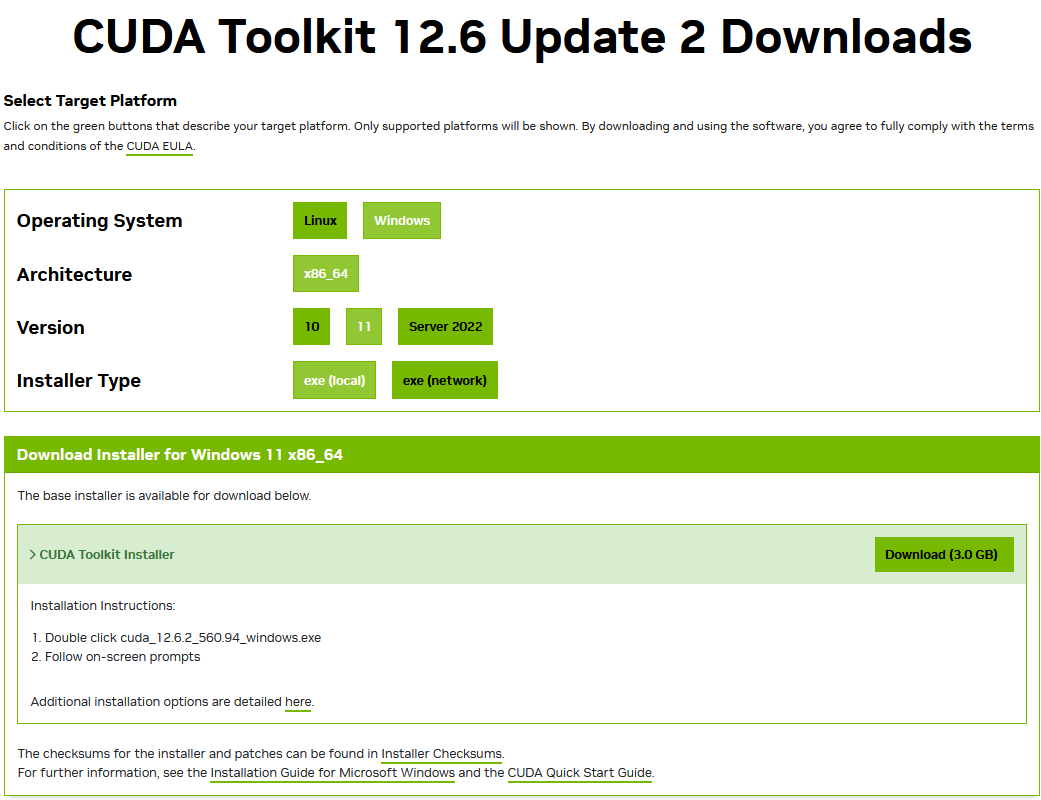
In my case, CUDA was not preinstalled. You can download the current version from the NVIDIA website.
You can then run the script again. Ideally, a similar message will be displayed:

The script has been extended to use “CUDA” and “large model”.
Models and their accuracy in various languages
The following graphic by OpenAI shows the accuracy of the various Whisper models in a variety of languages. This performance measurement is based on WER (Word Error Rate) and CER (Character Error Rate), evaluated on the Common Voice 15 and Fleurs datasets. Each Whisper model was tested for a range of languages to illustrate its ability for accurate transcription and its performance differences depending on the language. For example, a WER value of 5.7 for German indicates that the model makes about 5.7 errors per 100 transcribed words, which represents relatively high accuracy. The graphic thus gives you a good idea of which model is particularly effective in which language.